- Home
- :
- All Communities
- :
- User Groups
- :
- Alaska GIS Users
- :
- Blog
- :
- Tips (LocalLayer widgets) for more customization a...
Tips (LocalLayer widgets) for more customization and Updating (may help with others too)
- Subscribe to RSS Feed
- Mark as New
- Mark as Read
- Bookmark
- Subscribe
- Printer Friendly Page
- Report Inappropriate Content
8/12/2015 - Quick update after WAB 1.2 release for LocalLayerWidget Today’s update is just to include some notes provided by Daniel Stoelb …nothing else has been modified (PDF has also been updated to reflect this update) :
When working with the Local Layer widget in the 1.2 developer edition, the file location to modify in the config file for it to recognize in the WAB1.2:
- \arcgis-web-appbuilder-1.2\client\stemapp\predefined-apps\default\config.json
- \arcgis-web-appbuilder-1.2\client\stemapp\predefined-apps\basic_viewer\config.json
- \arcgis-web-appbuilder-1.2\client\stemapp\predefined-apps\editor\config.json
- \arcgis-web-appbuilder-1.2\client\stemapp\predefined-apps\simple_map_viewer\config.json
March 20, 2015 - for a list of WAB resources, check out Web AppBuilder Developer Edition - Customization Resource List
The information below may be out of date since WAB 1.1 was released yesterday and updated may have been made to the custom widget(s). I have not been able to test. However, ther still may be some good information below.
Feb 18, 2015 -- work in progress, but lots of info below. I made this as a separate blog post, and not with a PDF attachment. Please leave comment if PDF version is preferred.....with shorter intro. (see my Tips on installing WAB for "blog, all inclusive" vs the Tips for LocalLayer widget, with the PDF attached.....links are shown in second paragraph below.)
Updating to a new LocalLayer widget release (after you’ve already started customizing)
--- may also help with updating other widgets ---
New releases of the LocalLayer widget have been rapid over the past couple weeks as Adam Drackley and Robert Scheitlin, GISP have made improvements to the code. So, what do you do if you’ve already spent time tweaking and customizing your installed version? First, there is nothing that says you have to upgrade, but in order for Adam, Robert and others to help, it probably is best to upgrade to the latest released version since it may have added a feature, or fixed a bug.
The following are tips that may help in setting up a consistent procedure for updating. However, since each customization will vary, steps may need to be expanded or adapted for your own site(s). [Note: some steps are similar to a first install, so see Tips and Observations for getting Web AppBuilder - Developer Edition Installed and Tips for using the custom LocalLayer widget with WAB-Dev edition for more detailed instructions.]
First, before an update, I recommend making a backup of your current WAB folder installation folder. This will give you a recovery point if things get messed up during the custom upgrade to your code. Upgrading is not difficult, but if doing a lot of cut-and-paste from your files, things happen sometimes. Also, it gives you a location to copy you custom code from. These steps should be performed while WAB and node.js are shutdown.
- Hint: I also keep a “clean” version of the WAB folder that just contains the default WAB 1.0 and the default custom widgets. This allows me to start fresh if things get too out of whack. And occasionally, I will start over with this, to undo anything I may not have needed to do.....wait until you feel more comfortable with the process....and always keep a backup.
Note: I will mention this again later, but it's important enough to mention up front:
- Brackets () [] {} must be balanced and in proper location.
- commas may need to be moved, added and/or removed….
- if not, widgets may not display or work properly.
Installing new version:
- Go to https://github.com/cmndrbensisko/LocalLayerWidget to download the latest version.
- Extract the .zip to a new location (do not directly overwrite current folder).
- Rename the extracted folder to match the name of the current widget folder. Recommend “LocalLayer” but it can be called anything, as long as the “url” variables are setup to match it (see initial installation instructions). If upgrading from LL version prior to 1.3, make sure all url variable are set as described. Instructions below assume folder is called LocalLayer
- Rename the current folder(s) to in <WAB > \client\stemapp\widgets AND all your created sites <WAB> \server\apps\##\widgets where the LocalLayer widget exists to LocalLayer_v1.4_old (or similar). Keep a list of the apps\## folders that have this folder. Not all apps will have it, if you did not customize using the LocalLayer widget.
- Copy the new LocalLayer folder to each of these locations.
- NOTE: Look at the folder copied and make sure all the files/subfolders are in the “root” of this LocalLayer folder…and not in a subfolder under that. Make adjustments if needed. (depending on how you un-zipped the file, this could change)
- If you have named the new folder something other than the previous name, you will need to update the “url” variables to match the new folder name
- At this point, any NEW app should use the new version of LocalLayer. However, if you customized the widget in any of your apps, these changes may not yet be shown.
Notes and Steps for transferring to updated version:
- For existing customized apps, there are key config files that get modified when configuring a typical widget. Many of these files are found in <WAB-install> \server\apps\##\widgets\
- Some KEY files for the LocalLayer widget: (and most likely the default layer, pop-ups, and attribute tables, as well)
- For layers and pop-up configuration <WAB> \server\apps\<#>\configs\LocalLayer\config_Local Layer Widget.json
- Note: spaces between “Local Layer Widget”
- For attribute configuration <WAB> \server\apps\<#>\configs\AttributeTable\config_Attribute Table.json
- Note: spaces between “Local Table”
- For layers and pop-up configuration <WAB> \server\apps\<#>\configs\LocalLayer\config_Local Layer Widget.json
- The Config files in this directory may NOT have changed.However, there may be features that were added or changed to the widget that may not be reflected unless certain files are updated. Samples of this is when the ability to add Tile services was added, and when customizing the ability to modify the output format for a numeric field in pop-up was added. For some reason, the Tile service option did not show up for me. Neither did the pop-up field-formatting (but that was easy to modify in the config file). There are several tips I can give to help what can or may need to be transfered:
- Read the readme file to see if there are clues as to what needs to be updated, manually. This may or may not give you enough info.
- Test first. See if things come up in WAB or not. The new version could very well already work.
- One thing I found that works for some of the widgets, is to remove them from my app (make sure you have backup first), save, then add the widget back. This should get a clean copy of the widget from the <WAB > \client\stemapp\widgets folder. You can see as this is happening if you look at the node.js window.
- If not,start from a "clean" WAB folder (see starting from scratch in the install document in my blog (link in first paragraph above). Make sure all the custom widgets are in place. Create a new site, making sure to do something with each widget you updated, and compare the files.
- Open the customized/backup-up version of each of files in a editor, preferably one that recognizes JavaScript code.. This will be used for copy-and-paste source.
- NOTE: There are many editors available that can understand Javascript, There are many available, including free versions NotePad++ with addi-ins. Myself, I use Brackets. but it's all a matter of preference.
- Poll on user preferences with other options
- Lots of additional resources, including info on IDE/Editors (towards bottom) Building Applications Using the ArcGIS API for JavaScript Resources
- Open the config file to edit. If things need to be added to the config, carefull sut and paste to new file. Restart WAB to test.
- Note: Make sure brackets () [] {} are balanced and in proper location, and commas are where they are needed (may need to be moved, added and/or remove). If not, widgets may not display or work properly.
- Some additional notes on what you might have customized items is listed below...
Addition tips and links for customization (gathered from testing and GeoNet threads)
NOTE: many widget configuration, including items not configured in the widget UI, can be found in the config files found in <WAB> \server\apps\<#>\configs\
NOTE: Always make sure that () {} [] balance and to add/move/remove comma as needed
- Attribute Table <WAB> \server\apps\<#>\configs\AttributeTable\config_Attribute Table.json :
- Change “Layer name” shown in tab in attribute table. By default it shows the layer name as provided in the feature service. To override, modify the “name”: value for the layer in “layerInfos”: .... in "config_Attribute Table.json"
- Rearranging order of attribute tables shown. You can do this in "config_Attribute Table.json". Take care to add comma, if needed, between the "tab section" moved, and to make there isn't one after the last on in list.
- Note about relationship between "config_Local Layer Widget.json" and "config_Attribute Table.json"
- The "name" tag in the Local Layer config file corresponds to the "id" tag in the Attribute Table config.
- This "id" need to be unique, and typically has "_#" added to the end, with the # corresponding to the MapServer/# in the "url"
- The layer does not need to be turned on to get the attribute to show, but may need to tweak the "show" in the Attribute Table to be true.
- If layer display is off, but attribute "show": true double-clicking the record in attribute table does not zoom-to. Turning display of layer on, zoom-to works.
- Change “Layer name” shown in tab in attribute table. By default it shows the layer name as provided in the feature service. To override, modify the “name”: value for the layer in “layerInfos”: .... in "config_Attribute Table.json"
- Auto filter by extent (as default) Can attribute table results be limited to map extent by default?

- Custom pop-up information…where stored…how to copy forward
- server\apps\XX\configs\LocalLayer\config_Local Layer Widget.json
- https://community.esri.com/thread/121464
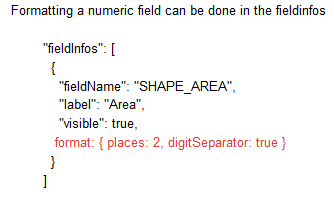
- Custom pop-up --- formatting a numeric field
- This custom functionality was added in a version post 2/2/15 (1.3?)
- If copying forward a prior version, or want to add functionality manually:
- Field info can be found in server\apps\##\configs\LocalLayer\config_Local Layer Widget.json
- How do I format a numeric field in a pop-up (WAB Developer)
- How do you set a custom javascript widget's size?
- Measure Widget 1.1.1 for Web App Builder (@Tom Sellsted)
- HTMLPopup redirect on click
- Widget Url (extent tracking in URL and communication between url and others widgets) for WebApp Builder for Arcgis URL widget (extent tracking...)
- WAB Draw Widget Measure Problem …bug in WAB 1.0 core…..solution, pending fix.
...more to come later
You must be a registered user to add a comment. If you've already registered, sign in. Otherwise, register and sign in.