- Home
- :
- All Communities
- :
- Products
- :
- Data Management
- :
- Data Management Blog
- :
- Assigning Address Ranges Based on Existing Address...
Assigning Address Ranges Based on Existing Address Points
- Subscribe to RSS Feed
- Mark as New
- Mark as Read
- Bookmark
- Subscribe
- Printer Friendly Page
- Report Inappropriate Content
I have been able to assign address ranges to centerlines based on actual address points placed on houses. I have written several posts on the ESRI User Forum, but found that my ideas evolved after writing each post as I continued working on the problem. Unfortunately I could not edit posts after 24 hours had passed from the initial post time, so outdated and even incorrect information would become part of the thread that I could not revise, correct or update. I wrote this paper in a Google Doc originally in an attempt to bring my documentation up to date and allow me to continue to develop better techniques and procedures that achieve the goal of creating address ranges on centerlines.
In the instructions below I suggest feature class and table names for the outputs of each process which are assumed in the SQL selections and field calculations. These names are the suggested output base names and can be used as proposed if your jurisdiction is small enough to process all of the addresses at one time. However, due to performance issues at some steps, I generally recommend processing only a maximum of 50,000 address points at one time and dividing a jurisdiction up if that limit would be exceeded. My jurisdiction is too large to do all 650,000+ addresses at one time. Therefore, in my example screen shots I am processing a single area plan, known as the Jurupa area plan, which is within the limit of the above criterion. I create a separate file geodatabase for the processing outputs of each area, so that I will not have to rename the output files created using these methods or overwrite them or rename them when I process the addresses of a different area.
What Do You Need to Use this Approach?
In order to use this approach you will need:
1. ArcMap 10.0 or above with a Basic (ArcView) License. Where an Advanced license would let you more easily perform certain tasks the alternative approach with that license will be noted.
2. You will need a Centerline polyline network covering your jurisdiction(s) of interest. The Centerline Feature Class will need to include the following fields or their equivalent:
a. Street Name fields. It is recommended that you have fields for the Full Street Name and the Street Name Components, especially the Base Street Name (the primary street name excluding any pre- or post- compass directions or suffixes, like Ave, Blvd, Rd, St, Way, etc.)
b. Address Range Fields. In this paper these fields will be assumed to be named L_F_ADD (Left From Address), L_T_ADD (Left To Address), R_F_ADD (Right From Address), and R_T_ADD (Right To Address). These fields can be text, long or double fields.
c. A Route ID or Route Name field for a Linear Referencing Route is recommended, and required if you have never built a Linear Referencing Route network from your centerlines. If your Route ID/Name is based on the Street Name it is recommended that the name component fields to build a Route Name would be included. For example, I have a required Area_Plan_Abbreviation field and an optional Subroute field that hold values that are appended to the street name in the Route_Name field to make my Routes group by area and so that they form simple routes.
3. You will need an Address Point layer covering the same area of interest covered by the Centerlines. The Address Point Layer will at a minimum contain the following fields or their equivalent:
a. Street Name fields, particularly the Base Street Name of the components of a full street name. A Full Street Name field is optional.
b. A House Number field. This field should be numeric, but it can be text.
c. A unique ID field for each address point that in a field other than the ObjectID. A Long field that duplicates the ObjectID is fine.
4. An optional Linear Referenced Route Network. The network should be built from your centerlines. It should be monotonic, meaning that there are no branching routes and that measures on the routes would increase with each successive vertex only, never decrease, or duplicate a prior measure. If a route has not been created a method for creating one is included in this paper.
5. I strongly recommend using a file geodatabase for this task over using shapefiles and/or dbf tables. The field names generated will get much longer than the 10 character limit of a shapefile/dbf table during this exercise and field name truncation will not be used in any examples provided in this paper. All SQL will be based on the assumption that you are using a file geodatabases. Also, performance, precision and many other factors make a file geodatabase much better for this exercise than a set of shapefile and dbf tables. Modifying outputs will be a common exercise so file geodatabases are preferable to SDE for speed and flexibility in making such modifications and SDE provides no real benefits during the many geoprocessing steps involved. So start by creating and porting your data to a file geodatabase if you have not already done so and set that file geodatabase as the default output location in the geoprocessing environment settings of the MXD map document file you will be using.
Constructing a Linear Referencing Route Network
This step is only required for those who have never previously created a Route Network based on their centerline network before. If you already have such a network you can skip to the next section.
1. The Centerlines should have a Route ID or Route Name field included. If you have no particular system for defining such routes in your state you can initially define the Route ID/Name as the Street Name. However, I normally create a separate ROUTE_NAME field on my centerlines so I can modify the original street names with area designations or unique numbers that help better define sets of centerlines that should be grouped as a single route, especially for large networks that may have widely separated unrelated streets that have the same street names. it should have enough characters in the ROUTE_NAME field to allow the name to be changed to keep routes from having huge gaps or including branches. I recommend that you include a separate field for coordinate priority, which you can initially calculate to be equal to LL (for Lower Left, see step 2).
2. Initially build the route network using the Create Routes tool in the Linear Referencing Tools toolbox. The settings for the tool should use the centerlines as the input line network, the Route ID/Name field of the centerlines, Length as the measure source option, and LOWER_LEFT as the coordinate priority and use the NO_IGNORE option for measuring gaps.
3. The measures environments settings should permit fractional tolerance and resolution values. In the case of my particular data, I use a tolerance of .001 and resolution of .0001 on my routes which have measure lengths based on feet.
4. The measures should be based on feet or meters rather than miles or kilometers and if necessary use the optional measure factor to make the conversion. See the conversion of units entry on Wikipedia for measure conversion factor values.
5. If you have a very large centerline network consider using model builder to construct the routes by areas or street name groups and append them together using the Append and/or Merge tools in the Data Management Tools toolbox -> General toolset. Try not to build more than 10,000 separate routes at once, since performance of the Create Routes tool can drop dramatically when too many routes are being built at once.
6. Add four double fields called PARTS, FROM_MEAS, TO_MEAS and MEAS_LENGTH to the routes output and calculate them using the Python parser of the Field Calculator to be equal to !Shape.PartCount!, !Shape.FirstPoint.M!, !Shape.LastPoint.M! and !Shape.LastPoint.M! - !Shape.FirstPoint.M! respectively. Select the routes that have a PARTS value greater than 1.
7. Use the Multipart to Singlepart tool in the Data Management Tools toolbox -> Features toolset on the route selection. Add two fields called PART_FROM_MEAS and PART_TO_MEAS and calculate them using the Python parser of the Field Calculator to be !Shape.FirstPoint.M! and !Shape.LastPoint.M! respectively.
8. On the last output use the Sort tool in the Data Management Tools toolbox -> General toolset if you have an Advanced license or the Dissolve tool in the Data Management Tools toolbox -> Generalization toolset for a lower license with the Route ID/Name fields, PART_FROM_MEAS, and PART_TO_MEAS fields as the sort/case fields (and for Dissolve get the Sum of the length field as the Summary field).
9. Examine the output for large jumps in measures or overlapping measures to discover the parts that should be broken into new routes, particularly if measures overlap.
a. Create a relate back to the Multipart to Singlepart output to select and examine the actual segment locations that appear to be odd.
b. Edit the underlying centerline Route ID/Name fields to separate unrelated or branching parts into new routes.
c. Alter the coordinate priority for routes that orient diagonally perpendicular to the Lower Left corner to UL (more easterly/westerly routes) or LR (more northerly/southerly routes) and separately construct those routes with the Create Route tool for appending as described in step 5.
d. Consider fixing the Centerline network itself using topology if a lot of small gaps exist between centerlines that are not meaningful, since these can cause routes to be constructed strangely if their ends go past each other.
e. Consider creating new Route ID/Names at jurisdictional boundaries if address ranges will be reset at those boundaries. It will eliminate many steps involved in creating ranges where two or more range sets occur on the same street name.
10. Repeat steps 2 through 9 until all routes are either single part or only have small gaps and no branch pairs connect.
Converting and Validating Address Points as Linear Referenced Events
1. If you intend to process your addresses in groups, such as by City or area, you should create a separate geodatabase for each address set. This will allow you to use the default table or feature class names used in this document, which will make using the field calculations easier when your join data. You should also change the Workspace Environment settings under the Geoprocessing Menu to use that database for all tool outputs.
2. Your Address Points should have a UniqueID value for each point in a field other than the ObjectID field. A Long field that duplicates the ObjectID is fine. You Address Points should also have two double fields preferably named X_COORDINATE and Y_COORDINATE that you have calculated to hold the original coordinates of the address point using the Geometry Calculator.
3. Use the Locate Features Along Routes tool in the Linear Referencing Tools toolbox to convert the address points to linear referenced events. Here are the settings I use:
a. Input Features: Address Points
b. In Routes: My Road Network Routes
c. RouteID field: ROUTE_NAME
d. Radius: 1000 (feet)
e. Out Table: Default name assigned by tool
f. Out Event Properties: RID, POINT, MEAS, “”
g. Route Locations: All
h. Distance Field: DISTANCE
i. Zero Length Events: ZERO
j. In Fields: NO FIELDS
k. M Direction Offsetting: M DIRECTION
With these settings it took approximately an 1 ½ hours to process 83,485 address points along 5,211 routes. It outputted 1,342,451 point events, which will be reduced to the correct number of matches in subsequent steps. I chose the radius of 1,000 feet after observing that this set of addresses included several large areas of rural roads with many addresses at that offset distance, but the large number of events generated was due to letting the tool find all route locations with this radius being applied to roads in densely addressed areas. It is important to get all address locations, and not just the closest route event, because corner lots often have side roads closer to their address point than the addressing street when they are located in the center of a parcel. The amount of processing time the tool took was not significantly reduced when I used a lower radius setting; however, the larger the radius the larger the number of false matches. The side Offset Distance field is important for later steps. If your addresses have no reliable unique value field other the ObjectID, use the NO FIELDS option to preserve the ObjectID of each address in a field called INPUTOID, and join the Address Points ObjectID field to the output’s INPUTOID field and export it to get the rest of the address fields transferred.
4. It takes several steps to extract the correct matches from the output of step 3 above. The first of these steps is to select all features where the base street name of the Address is within the ROUTE_NAME (since my routes include the actual road name), or within a RouteID table that associates a full street name to each of your RouteID values. I use the following expression to do the selection and then export the selection to a new event table called ADDRESS_POINTS_Matched:
a. ROUTE_NAME LIKE Concat(Concat(‘%’, STREET_NAME), ‘%’)
5. Since it is possible for the base street name to be contained within more than one full street name (i.e., the base street name “CEDAR” is in CEDAR AVE, CEDAR CT, CEDAR CREST DR, CEDARWOOD DR, RED CEDAR RD, etc.), the Summary Statistics tool, located in the Analysis toolbox in the Statistics toolset, should be used to summarize all of the addresses in the ADDRESS_POINT_Matched table to find all matches with more than one location for the address. This will also help isolate addresses that were matched to several equidistant point locations along the interior bend of a curved road. Include the Base Street name of the address point, and summaries of the RouteID Min and Max, Measure Min, Max and Range. Fix all duplications of an address that are due to more than one street having the same base name within the tolerance distance to the address by deleting the incorrect record.
6. Select all records in the ADDRESS_POINTS_Matched table and apply the selected records only option to the table view for that event table. Sort all of the events so that the Base Street Names are ascending, subsorted by the Route Full Street Names and any other values that you think will help you easily identify the real matches. Highlight all records that are correct matches and unselect them. When you have finished, all remaining selected records should be able to be deleted.
7. Right click the ADDRESS_POINTS_Matched in the table of Contents and use the Joins and Relates context menu item to generate a Relate to the Located Events table output from step 3 above on the INPUTOID fields (or any other unique value field retained from your addresses).
8. Select all records in the ADDRESS_POINTS_Matched table.
9. Perform the relate selection to the Located Events table and sort the selection to group all base street names together, subsorted by the Route Full Street Names..
10. Invert the transferred selection.
11. Select from the Current Selection all events that have the same first letter in the base street name and the street full name using the expression: SUBSTRING(ROUTE_NAME FROM 1 FOR 1) = SUBSTRING(STREET_NAME FROM 1 FOR 1)
12. Right click the Located Events table output from step 3 in the table of Contents and use the Joins and Relates context menu item to generate a Relate to the original Address Points on the INPUTOID/OBJECTID fields (or any other unique value field retained from your addresses).
13. Perform the relate selection from the Located Events table to the Address Points.
14. Examine the groups of events that did not match due to spelling variants or misspellings and if necessary zoom to the corresponding address point locations to validate any incorrect spellings of base street names in either the address points or the centerlines that prevented matching. Unselect all of the records from the Located Events table that have names that should not have matched. When you have completed this step only real matches affected by misspellings will be selected.
15. Use the Append tool located in the Data Management toolbox in the General toolset to append all selected records from the Located Events table output from step 3 above to the ADDRESS_POINTS_Matched table.
16. Close and reopen the ADDRESS_POINTS_Matched table to refresh it and select all records in the ADDRESS_POINTS_Matched table.
17. Perform the relate selection to the Located Events table.
18. Invert the transferred selection.
19. Perform the relate selection from the Located Events table to the Address Points.
20. Examine the pattern of address points on the map and determine where a geometric relationship between the alignment of the address points and the roads should have been matched, but the street names are totally different. Select small sets of actual matches that meet these criteria in the Locate Feature Event table and transfer them to the ADDRESS_POINTS_Matched table.
22. Perform a Summary Statistics again on the ADDRESS_POINTS_Matched table to find all address events that are duplicated at two positions or that have more than one route associated with them and relate the selection as necessary to the Locate Features event output and Address Points as necessary to determine which matches should be retained and which false matches should be eliminated.
23. Add two double fields called EVENT_X and EVENT_Y to the ADDRESS_POINTS_Matched table. These fields will be calculated later in the next section.
Symbolizing and Displaying your Linear Referenced Address Point Events
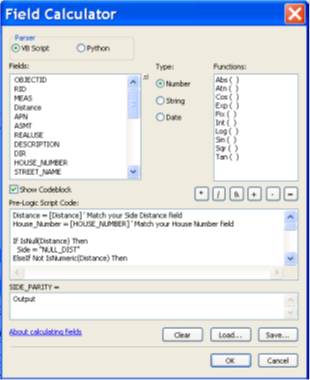
1. Once the events have been created, add a text field with 25 characters called SIDE_PARITY (parity is the term for even or odd numbering) and calculate it using the Field Calculator with the following formula:
a. Parser: VB Script
b. Show Codeblock: Checked
c. Prelogic Script Code:
Distance = [Distance] ' Match your Side Distance field
House_Number = [HOUSE_NUMBER] ' Match your House Number field
If IsNull(Distance) Then
Side = "NULL_DIST"
ElseIf Not IsNumeric(Distance) Then
Side = "NON_DIST"
ElseIf CDbl(Distance) = 0 Then
Side = "ON_LINE"
ElseIf CDbl(Distance) > 0 Then
Side = "LEFT_SIDE"
ElseIf CDbl(Distance) < 0 Then
Side = "RIGHT_SIDE"
Else
Side = "CHECK_SIDE"
End If
If IsNull(House_Number) then
Parity = "NULL_HOUSE"
ElseIf Not IsNumeric(House_Number) then
Parity = "NON_HOUSE"
ElseIf CLng(House_Number) = 0 Then
Parity = "ZERO_HOUSE"
ElseIf CLng(House_Number) Mod 2 = 0 Then
Parity = "EVEN_HOUSE"
ElseIf CLng(House_Number) Mod 2 = 1 Then
Parity = "ODD_HOUSE"
Else
Parity = "CHECK_HOUSE"
End If
Output = Side & ", " & Parity
d. SIDE_PARITY = Output (just enter Output in the expression for the field).
e. If this is the first time you have done this calculation, save it to a file with the Save button for easy reuse in the future.
f. Here is a screenshot of how it should look:
5. Save the Calculation Expression with the Save option if this is the first time you are doing this process so you can load it in the future. Name it something like Side_Parity.
6. Right click on the validated Address Event table and choose the Make Route Event Layer context menu item to create a point event layer from the event table. Use the Distance field as the Side Offset.
7. Click the Advanced Options… button at the bottom left corner of the dialog and set the paying particular attention to the “Events with a positive offset will be placed to the:” option.
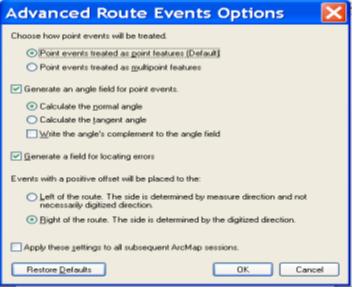
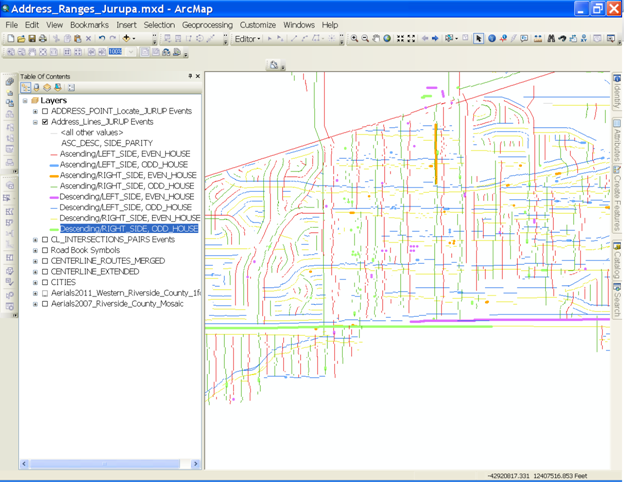
8. Change the symbology of the layer to the Categories using Unique Values and choose the SIDE_PARITY field as the field to symbolize. Add all values and make the colors contrast (My preference is to pair Blue and Gold and Red and Green on opposing sides.) Here is a screen shot of a layer set up:
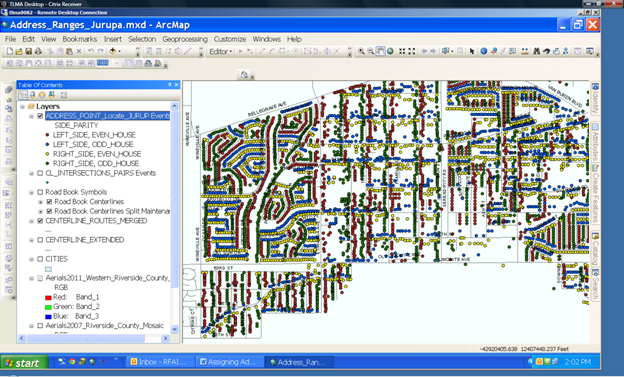
9. Make sure the addresses appear to match the expected sides of the street. If they don’t, open the layer Properties, go to the Source Tab, press the Set Data Source… button, press the Advanced Options… button and change the “Events with a positive offset will be placed to the:” option.
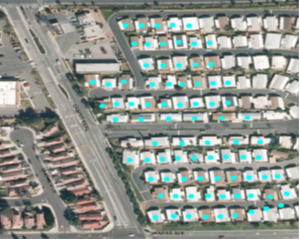
10. This should reveal the pattern of addressing that is typical for the East/West roadways and the North/South roadways. In this area East/West roadways are predominantly Left and Odd and Right and Even, while North/South roadways are Left and Even and Right and Odd house numbers.
11. Export the Address Point Event layer from the table of contents to create an actual point feature class called Address_Points_Temp.
12. Use the Geometry Calculator to calculate the EVENT_X and EVENT_Y fields in the Address_Points_Temp feature class (Although the .Geometry Calculator can be used on the point event layer, it will take a very long time to complete the calculation if there are a lot of address point events, but only a short time to do the Geometry Calculation on points in an actual feature class).
13. Open the ADDRESS_POINTS_Matched table and join the Address_Points_Temp feature class to it using the common unique ADDRESS_ID field from your original Address Points and calculate the EVENT_X and EVENT_Y fields of the ADDRESS_POINTS_Matched table from the same fields in the Address_Points_Temp feature class. Afterward, break the join.
14. Open the Address Point Event layer attribute table and select records with the following expression to select address points that have been moved more than a specified distance in either coordinate direction (I specified a displacement of at least 15 in each direction): (ABS( X_COORDINATE - EVENT_X ) > 15 OR ABS( Y_COORDINATE - EVENT_Y ) > 15) AND RID > ' '.
15. This selection can be used to find all address points that are either located around the bulb of a cul-de-sac, curving around a knuckle, affected by odd curves or zigzags in your route, or that fall within a gap in your route or beyond the end of a route that does not fully cover an addressed road. A relate to the original Address Points is useful to also select the original address events so you can more easily see how much displacement has occurred. I retained points that are surrounding cul-de-sacs and knuckles, but removed points that fell in gaps or beyond route ends where the routes do not fully cover the actual road, since those addresses should be assigned to ranges on new portions of centerline that I should create later. Zigzag roads may cause the portion of the road that the address actually fronts along to move farther away from the address point than the portion that it does not front along. I either remove those address events or manually adjust the measure to make them fall along the correct portion of the zigzag.
Dealing with Unitized Addresses
Most addresses do not have a Unit number assigned, but those that do can create clusters of duplicated house numbers, which can distort address range assignments if they are not isolated to a single house number location.
1. Here is my address layer after using a definition query to filter the layer to only show addresses that have Unit numbers.

2. Each cluster that duplicates the same House Number address will have to be reduced to a single house number point location using a new field (which I chose to call REMOVE_UNITS) that will flag the unit points that should not be used for creating ranges.
3. Here is an example of one set of duplicated house numbers due to unitization with the units to be removed shown selected in blue and the unit that will remain shown in red (next to the road below the entry driveway).
4. In some cases the measure value of the remaining cluster point may need to be adjusted to a new pseudo-position relative to the street they are addressed on if their real position is not well placed for the overall range or where the mailing address is really located.
Converting Address Points to Line Segment Events
To help understand our address configuration better and get house pairs on each side of our centerline segment end points, we will convert the Address Points to Address line segments that connect each adjacent address of the same number type (odd or even) that are on the same side (left or right) of the centerline routes. Here is how to do that:
1. First create a copy of the addresses from the event table (not the event layer) with a filter set to REMOVE_UNITS IS NULL to another table and name it something like Address_Lines_Temp.
2. Use the Append tool in the Database Management Tools toolbox -> General toolset to append another copy of the addresses with the filter into the Address_Lines_Temp table you just copied from the address point events to duplicate them.
3. Use the Summary Statistics tool in the Analysis Tools toolbox -> Statistics toolset on the Address_Lines_Temp table and name its output Address_Lines_Sort. For the Statistics field get the Count of the OBJECTID field (the objective it to get a count of 1 for each record with no summarization, only sorting). For the Case fields use the field below in the following order:
a. RID field
b. SIDE_PARITY field
c. MEAS Field
d. The House Number field
e. The Full Street Name field or all of the Street Name component fields
f. Unit Number (distinguishes House_Numbers that may repeat)
g. City Field
h. Zip Code Field
i. An Assessor’s Parcel Number field if available.
j. The Distance field for the side offset.
k. OBJECTID field (this field will not appear twice in the output, but still acts to prevent summarization of otherwise duplicate records in the output)
l. Any other field you like from the address points attributes. I Included:
i. STREET_NAME (Base Street Name)
ii. STREET_TYPE
iii. DIR (Street Direction in Full Name)
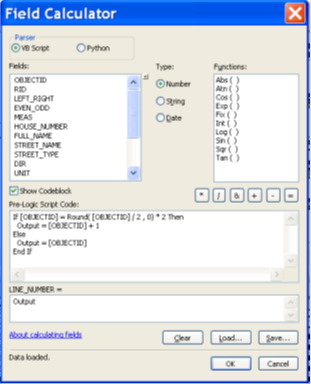
4. Add a long field called LINE_NUMBER to the summary table and calculate its value to be:
a. Parser: VB Script
b. Show Codeblock: Checked
c. Prelogic Script Code:
If [OBJECTID] = Round( [OBJECTID] / 2 , 0) * 2 Then
Output = [OBJECTID] + 1
Else
Output = [OBJECTID]
End If
d. LINE_NUMBER = Output (Only type the word Output in the expression text box)
e. Here is a screen shot of how the field calculator set up should look:
5. Save the Calculation Expression with the Save option if this is the first time you are doing this process so you can load it in the future. Name it something like Line_Numbers.
6. Use the Summary Statistics tool in the Analysis Tools toolbox -> Statistics toolset on the Address_Lines_Sort table and name its output Address_Lines. For the Statistics fields use the following:
a. MEAS Min
b. MEAS Max
c. OBJECTID Min
d. OBJECTID Max
For the Case fields use the fields below in the following order:
a. RID Field
b. SIDE_PARITY Field
c. LINE_NUMBER field
7. The number of records generated should be slightly more than half of the duplicated records in the Address_Lines_Temp table if several routes were represented, since the first record and last record of each new route will not link to the adjacent record of another route.
8. Add the following fields to the Address_Lines summary output:
a. FROM_MEAS double
b. TO_MEAS double
c. FROM_HOUSE_NUMBER Long
d. TO_HOUSE_NUMBER Long
9. Optionally add additional fields. I chose to add the fields below
a. FROM_FULL_NAME text 60
b. TO_FULL_NAME text 60
c. FROM_STREET_NAME text 40
d. TO_STREET_NAME text 40
e. FROM_STREET_TYPE text 5
f. TO_STREET_TYPE text 5
g. FROM_DIR text 2
h. TO_DIR text 2
i. FROM_DISTANCE double
j. TO_DISTANCE double
10. Calculate the FROM_MEAS field to be equal to the MIN_MEAS field and the TO_MEAS field to be equal to the MAX_MEAS field.
11. Join the MIN_OBJECTID to the OBJECTID of the Address_Lines_Sort table and calculate the matching FROM_ fields set to be equal to the HOUSE_NUMBER, FULL_NAME, STREET_NAME, STREET_TYPE, DIR, and Distance fields.
12. Break the join.
13. Join the MAX_OBJECTID to the OBJECTID of the Address_Lines_Sort table and calculate the matching TO_ fields set to be equal to the HOUSE_NUMBER, FULL_NAME, STREET_NAME, STREET_TYPE, DIR, and Distance fields.
14. Break the join.
15. Add a text field with 20 characters called ASC_DESC to the table.
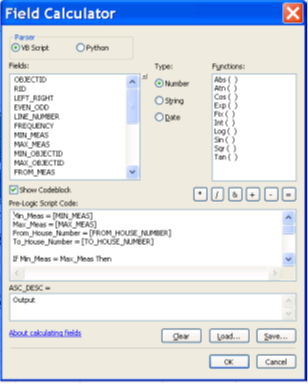
16. Calculate the ASC_DESC field to be equal to the following:
a. Parser: VB Script
b. Show Codeblock: Checked
c. Prelogic Script Code:
Min_Meas = [MIN_MEAS]
Max_Meas = [MAX_MEAS]
From_House_Number = [FROM_HOUSE_NUMBER]
To_House_Number = [TO_HOUSE_NUMBER]
If Min_Meas = Max_Meas Then
Output = "Same Measure"
ElseIf To_House_Number > From_House_Number Then
Output = "Ascending"
ElseIf To_House_Number < From_House_Number Then
Output = "Descending"
ElseIf To_House_Number = From_House_Number Then
Output = "Same House Number"
Else
Output = ""
End If
d. ASC_DESC = Output (only type the word Output in the expression text box).
e. Here is a screenshot of how the calculation looks:
17. Save the Calculation Expression with the Save option if this is the first time you are doing this process so you can load it in the future. Name it something like Asc_Desc_Add_Pairs.
18. Add a double field named HOUSE_INTERVAL to the line event table.
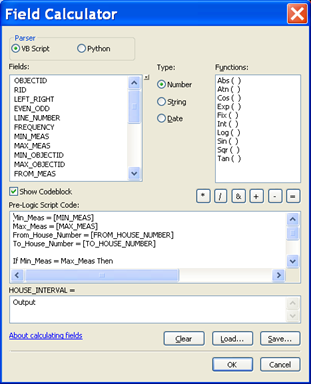
19. Calculate the HOUSE_INTERVAL field to be equal to the following:
a. Parser: VB Script
b. Show Codeblock: Checked
c. Prelogic Script Code:
Min_Meas = [MIN_MEAS]
Max_Meas = [MAX_MEAS]
From_House_Number = [FROM_HOUSE_NUMBER]
To_House_Number = [TO_HOUSE_NUMBER]
If Min_Meas = Max_Meas Then
Output = 0
ElseIf Not IsNull(To_House_Number) and Not IsNull(From_House_Number) and (To_House_Number - From_House_Number) <> 0 Then
Output = (Max_Meas - Min_Meas) / (To_House_Number - From_House_Number)
Else
Output = 0
End If
d. HOUSE_INTERVAL = Output (Just type the word Output in the expression text box).
e. Here is how the calculation looks:
20. Save the Calculation Expression with the Save option if this is the first time you are doing this process so you can load it in the future. Name it something like House_Interval_Add_Pairs.
Evaluating the Address Line Output for Unexpected Patterns
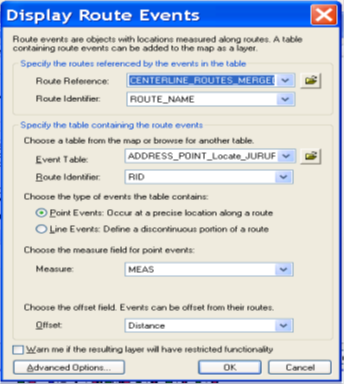
1. Right click the Address_Lines table in the Source tab of the Table of Contents and choose the Display Route Events… context menu item.
2. Set the layer to be a Line Event layer with the MIN_MEAS and MAX_MEAS fields being the From and To Measure fields respectively. Assign either the FROM_DISTANCE or TO_DISTANCE Field as the Side Offset field.
3. Here is how the dialog looked when I configured it for my specific data:
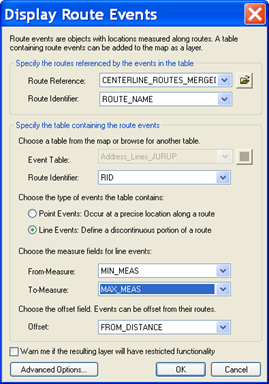
4. Press the OK button.
5. If the lines do not align with the Address points, open the layer Properties, go to the Source Tab, press the Set Data Source… button, press the Advanced Options… button and change the “Events with a positive offset will be placed to the:” option.
6. In the Layer Properties go to the Symbology tab and use a Multi-field Category symbology for the layer with the ASC_DESC field and the SIDE_PARITY field providing the Unique values.
7. Press the Advanced… button and change the delimiter character for field value separation from a comma to a slash.
8. Add all values and then remove all values that are not Ascending or Descending.
9. Adjust the colors to make the primary colors match the expected sort direction for the addresses and contrasting secondary colors for the opposing unexpected directions and thicken the unexpected direction lines slightly. You can make <all other values> grey.
10. Here is the symbology configuration that worked for this particular project area:
11. Small segments near the disconnected end of a line are frequently due to House Numbers not aligning perfectly around cul-de-sac bulbs, which is a known issue.
12. Longer segments or segments along the length of the line or near a connected line end are potential errors in house numbering (such as number transpositions) or possibly indicators that the house numbering pattern intentionally changes at different portions of the line and should be handled as separate address ranges. These segments should be examined more carefully to determine whether or not the anomaly can be ignored or needs to be addressed.
13. You can also make a copy of the line event layer and then change the Symbology to a Quantities – Graduated Color symbology based on the HOUSE_INTERVAL field. For my specific data the quantity ranges were divided as shown in the screen shot below (generally considering the range of values between 2 and 20 or -2 and -20 as valid).
14. Here is a screen shot of a layer set up based on the suggestion of step 13.

15. Values at the more extreme ranges (too small or too great on the positive or negative side) can indicate an anomalous house number or that a range expands or contracts significantly along portions of the route in a way that should be examined. When a centerline segment end is surrounded by an extreme range segment, it is more important that it should be examined and corrected if necessary.
16. To see some of the worst extremes that are most likely to include transposed numbers use this query and examine these segments:
"HOUSE_INTERVAL" > -0.5 AND "HOUSE_INTERVAL" < 0.5 AND "HOUSE_INTERVAL" <> 0 AND ABS( "FROM_HOUSE_NUMBER" - "TO_HOUSE_NUMBER") > 50
17. You can try expanding the range to see if other sets caused problems that need to be fixed using selections such as:
"HOUSE_INTERVAL" > -1 AND "HOUSE_INTERVAL" < 1 AND "HOUSE_INTERVAL" <> 0 AND ABS( "FROM_HOUSE_NUMBER" - "TO_HOUSE_NUMBER") > 50
Summarizing the Overall Range Trend and House Interval Line Events of an Address Range
Obtaining the route’s overall address range trend will help us determine the significance of a given house pair segment or set of segments that do not match our expectations.
1. On the Address_Lines event table Select by Attributes the rows where:
ASC_DESC IN (‘Ascending’, ‘Descending’)
2. Perform a Summary Statistics on the selection with an output called ADDRESS_LINES_FULL. For the Summary fields use the settings below:
a. FROM_MEAS Min
b. FROM_MEAS Max
c. TO_MEAS Min
d. TO_MEAS Max
e. FROM_HOUSE_NUMBER Min
f. FROM_HOUSE_NUMBER Max
g. TO_HOUSE_NUMBER Min
h. TO_HOUSE_NUMBER Max
i. HOUSE_INTERVAL Min
j. HOUSE_INTERVAL Max
k. HOUSE_INTERVAL Mean
3. For the Case fields use the fields below in the following order:
a. RID field
b. SIDE_PARITY field
4. Add a text field called ASC_DESC with 20 characters.
5. With the Field Calculator calculate the ASC_DESC field with the following settings:
a. Parser: VB Script
b. Show Codeblock: Checked
c. PreLogic Script Code:
If [MAX_TO_HOUSE_NUMBER] - [MIN_FROM_HOUSE_NUMBER] > [MAX_FROM_HOUSE_NUMBER] - [MIN_TO_HOUSE_NUMBER] Then
Output = "Ascending"
ElseIf [MAX_TO_HOUSE_NUMBER] - [MIN_FROM_HOUSE_NUMBER] < [MAX_FROM_HOUSE_NUMBER] - [MIN_TO_HOUSE_NUMBER] Then
Output = "Descending"
ElseIf [MAX_TO_HOUSE_NUMBER] < [MIN_FROM_HOUSE_NUMBER] AND [MAX_FROM_HOUSE_NUMBER] < [MIN_TO_HOUSE_NUMBER] Then
Output = "Ascending"
ElseIf [MAX_TO_HOUSE_NUMBER] > [MIN_FROM_HOUSE_NUMBER] AND [MAX_FROM_HOUSE_NUMBER] > [MIN_TO_HOUSE_NUMBER] Then
Output = "Descending"
Else
Output = ""
End If
d. ASC_DESC = Output (Only type the word Output in the expression text box).
6. Save the Calculation Expression with the Save option if this is the first time you are doing this process so you can load it in the future. Name it something like Asc_Desc_Full.
7. Add a double field called HOUSE_INTERVAL.
8. With the Field Calculator calculate the HOUSE_INTERVAL field with the following settings:
a. Parser: VB Script
b. Show Codeblock: Checked
c. PreLogic Script Code:
If [ASC_DESC] = "Ascending" Then
Output = ( [MAX_TO_MEAS] - [MIN_FROM_MEAS]) / ([MAX_TO_HOUSE_NUMBER] - [MIN_FROM_HOUSE_NUMBER])
ElseIf [ASC_DESC] = "Descending" Then
Output = ( [MAX_TO_MEAS] - [MIN_FROM_MEAS]) / ([MIN_TO_HOUSE_NUMBER] - [MAX_FROM_HOUSE_NUMBER])
Else
Output = 0
End If
d. HOUSE_INTERVAL = Output (Only type the word Output in the expression text box).
9. Save the Calculation Expression with the Save option if this is the first time you are doing this process so you can load it in the future. Name it something like House_Interval_Full.
10. Add a text field called GOOD_BAD with 4 characters to the output.
11. The different SIDE_PARITY values need to be separated into separate files and compared to determine the best range type for each road side. Therefore do four separate Select by Attribute queries for the four valid SIDE_PARITY values (SIDE_PARITY = ‘LEFT_SIDE, EVEN_HOUSE’, SIDE_PARITY = ‘LEFT_SIDE, ODD_HOUSE’, SIDE_PARITY = ‘RIGHT_SIDE, EVEN_HOUSE’, and SIDE_PARITY = ‘RIGHT_SIDE, ODD_HOUSE’) and export each selection to files named Add_Left_Even, Add_Left_Odd, Add_Right_Even and Add_Right_Odd respectively.
12. Join the Add_Left_Even table to the Add_Left_Odd table on the common RID fields.
13. Select the records where the Add_Left_Even.Frequency > Add_Left_Odd.Frequency OR Add_Left_Odd.OBJECTID IS NULL. Calculate the GOOD_BAD field of the Add_Left_Even table to “Good”.
14. Select the records where the Add_Left_Even.Frequency = Add_Left_Odd.Frequency. Calculate the GOOD_BAD field of the Add_Left_Even table to “Look”.
15. Select the records where the Add_Left_Even.Frequency < Add_Left_Odd.Frequency. Calculate the GOOD_BAD field of the Add_Left_Even table to “Bad”.
16. Break the Join.
17. Select all of the records that were marked ‘Bad’ in the GOOD_BAD field and in an edit session delete them.
18. Join the Add_Left_Odd table to the Add_Left_Even table on the common RID fields.
19. Select the records where the Add_Left_Odd.Frequency > Add_Left_Even.Frequency OR Add_Left_Even.OBJECTID IS NULL. Calculate the GOOD_BAD field of the Add_Left_Odd table to “Good”.
20. Select the records where the Add_Left_Odd.Frequency = Add_Left_Even.Frequency. Calculate the GOOD_BAD field of the Add_Left_Odd table to “Look”.
21. Select the records where the Add_Left_Odd.Frequency < Add_Left_Even.Frequency. Calculate the GOOD_BAD field of the Add_Left_Odd table to “Bad”.
22. Break the Join.
23. Select all of the records that were marked ‘Bad’ in the GOOD_BAD field and in an edit session delete them.
24. Join the Add_Right_Even table to the Add_Right_Odd table on the common RID fields.
25. Select the records where the Add_Right_Even.Frequency > Add_Right_Odd.Frequency OR Add_Right_Odd.OBJECTID IS NULL. Calculate the GOOD_BAD field of the Add_Right_Even table to “Good”.
26. Select the records where the Add_Right_Even.Frequency = Add_Right_Odd.Frequency. Calculate the GOOD_BAD field of the Add_Right_Even table to “Look”.
27. Select the records where the Add_Right_Even.Frequency < Add_Right_Odd.Frequency. Calculate the GOOD_BAD field of the Add_Right_Even table to “Bad”.
28. Break the Join.
29. Select all of the records that were marked ‘Bad’ in the GOOD_BAD field and in an edit session delete them.
30. Join the Add_Right_Odd table to the Add_Right_Even table on the common RID fields.
31. Select the records where the Add_Right_Odd.Frequency > Add_Right_Even.Frequency OR Add_Right_Even.OBJECTID IS NULL. Calculate the GOOD_BAD field of the Add_Right_Odd table to “Good”.
32. Select the records where the Add_Right_Odd.Frequency = Add_Right_Even.Frequency. Calculate the GOOD_BAD field of the Add_Right_Odd table to “Look”.
33. Select the records where the Add_Right_Odd.Frequency < Add_Right_Even.Frequency. Calculate the GOOD_BAD field of the Add_Right_Odd table to “Bad”.
34. Break the Join.
35. Select all of the records that were marked ‘Bad’ in the GOOD_BAD field and in an edit session delete them.
Validation of House Range End House Numbers for the Left Even Addresses
Although not all of the range patterns below will need any adjustment to the range ends house numbers, some will, particularly for cul-de-sac bulbs. The steps below outline how to get the largest house ranges from your data where they may have been missed by prior steps.
1. Create a Relate from the Add_Left_Even table to the Address_Lines table on the common RID field.
2. Create a Join from the Address_Lines table to the Add_Left_Even table.
3. Select By Attribute on the joined table and with the Create a Selection option select the records where:
Address_Lines.SIDE_PARITY = Add_Left_Even.SIDE_PARITY AND Add_Left_Even.GOOD_BAD = 'Good' AND Address_Lines.FROM_MEAS = Add_Left_Even.MIN_FROM_MEAS AND Add_Left_Even.ASC_DESC = 'Ascending' AND Address_Lines.FROM_HOUSE_NUMBER < Add_Left_Even.MIN_FROM_HOUSE_NUMBER
4. Break the Join.
5. From the Address_Line table perform the relate to get the matching record selection in the Add_Left_Even table.
6. Start an edit session on the Add_Left_Even table workspace.
7. Copy paste the lowest FROM_HOUSE_NUMBER of the Address_Lines selection to the MIN_FROM_HOUSE_NUMBER of the Add_Left_Even table on the matching RID values.
8. Recalculate the HOUSE_INTERVAL of the Add_Left_Even table using the formula saved in
9. Save the edits when all are finished.
10. Create a Join from the Address_Lines table to the Add_Left_Even table.
11. Select By Attribute on the joined table and with the Create a Selection option select the records where:
Address_Lines.SIDE_PARITY = Add_Left_Even.SIDE_PARITY AND Add_Left_Even.GOOD_BAD = 'Good' AND Address_Lines.FROM_MEAS = Add_Left_Even.MIN_FROM_MEAS AND Add_Left_Even.ASC_DESC = 'Ascending' AND Address_Lines.FROM_HOUSE_NUMBER > Add_Left_Even.MIN_FROM_HOUSE_NUMBER
12. With the Field Calculator calculate the FROM_HOUSE_NUMBER of the Addess_Lines table to be equal to [Add_Left_Even.MIN_FROM_HOUSE_NUMBER].
13. Break the Join.
14. Create a Join from the Address_Lines table to the Add_Left_Even table.
15. Select By Attribute on the joined table and with the Create a Selection option select the records where:
Address_Lines.SIDE_PARITY = Add_Left_Even.SIDE_PARITY AND Add_Left_Even.GOOD_BAD = 'Good' AND Address_Lines.TO_MEAS = Add_Left_Even.MAX_TO_MEAS AND Add_Left_Even.ASC_DESC = 'Ascending' AND Address_Lines.TO_HOUSE_NUMBER > Add_Left_Even.MAX_TO_HOUSE_NUMBER
16. Break the Join.
17. From the Address_Line table perform the relate to get the matching record selection in the Add_Left_Even table.
18. Start an edit session on the Add_Left_Even table workspace.
19. Copy paste the highest TO_HOUSE_NUMBER of the Address_Lines selection to the MAX_TO_HOUSE_NUMBER of the Add_Left_Even table on the matching RID values.
20. Recalculate the HOUSE_INTERVAL of the Add_Left_Even table using the formula saved in
21. Save the edits when all are finished.
22. Create a Join from the Address_Lines table to the Add_Left_Even table.
23. Select By Attribute on the joined table and with the Create a Selection option select the records where:
Address_Lines.SIDE_PARITY = Add_Left_Even.SIDE_PARITY AND Add_Left_Even.GOOD_BAD = 'Good' AND Address_Lines.TO_MEAS = Add_Left_Even.MAX_TO_MEAS AND Add_Left_Even.ASC_DESC = 'Ascending' AND Address_Lines.TO_HOUSE_NUMBER < Add_Left_Even.MAX_TO_HOUSE_NUMBER
24. With the Field Calculator calculate the TO_HOUSE_NUMBER of the Addess_Lines table to be equal to [Add_Left_Even.MAX_TO_HOUSE_NUMBER].
25. Break the Join.
26. Another check that can be done is to find instances where the extreme house numbers are inside the ends of the address range sets. After joining the line event table for the house pairs to one of the Add_... tables, this query can do that for Ascending routes for the Add_Left_Even table on the Min_From_House_Number:
Address_Lines_Features.SIDE_PARITY = Add_Left_Even.SIDE_PARITY AND Add_Left_Even.GOOD_BAD = 'Good' AND Address_Lines_Features.ASC_DESC IN ('Ascending', 'Descending') AND Add_Left_Even.ASC_DESC = 'Ascending' AND Address_Lines_Features.FROM_MEAS <> Add_Left_Even.MIN_FROM_MEAS AND Address_Lines_Features.FROM_HOUSE_NUMBER = Add_Left_Even.MIN_FROM_HOUSE_NUMBER
Validation of House Range End House Numbers for the Left Odd Addresses
These steps apply to the Right Odd Addresses, and are listed out to make it easier to follow. However, basically this section is a repeat of the process listed under the Validation of House Range End House Numbers for the Left Even Addresses.
1. Create a Relate from the Add_Odd_Even table to the Address_Lines table on the common RID field.
2. Create a Join from the Address_Lines table to the Add_Odd_Even table.
3. Select By Attribute on the joined table and with the Create a Selection option select the records where:
Address_Lines.SIDE_PARITY = Add_Left_Odd.SIDE_PARITY AND Add_Left_Odd.GOOD_BAD = 'Good' AND Address_Lines.FROM_MEAS = Add_Left_Odd.MIN_FROM_MEAS AND Add_Left_Odd.ASC_DESC = 'Ascending' AND Address_Lines.FROM_HOUSE_NUMBER < Add_Left_Odd.MIN_FROM_HOUSE_NUMBER
4. Break the Join.
5. From the Address_Line table perform the relate to get the matching record selection in the Add_Left_Odd table.
6. Start an edit session on the Add_Left_Odd table workspace.
7. Copy paste the lowest FROM_HOUSE_NUMBER of the Address_Lines selection to the MIN_FROM_HOUSE_NUMBER of the Add_Left_Odd table on the matching RID values.
8. Recalculate the HOUSE_INTERVAL of the Add_Left_Odd table using the formula saved in
9. Save the edits when all are finished.
10. Create a Join from the Address_Lines table to the Add_Left_Odd table.
11. Select By Attribute on the joined table and with the Create a Selection option select the records where:
Address_Lines.SIDE_PARITY = Add_Left_Odd.SIDE_PARITY AND Add_Left_Odd.GOOD_BAD = 'Good' AND Address_Lines.FROM_MEAS = Add_Left_Odd.MIN_FROM_MEAS AND Add_Left_Odd.ASC_DESC = 'Ascending' AND Address_Lines.FROM_HOUSE_NUMBER > Add_Left_Odd.MIN_FROM_HOUSE_NUMBER
12. With the Field Calculator calculate the FROM_HOUSE_NUMBER of the Addess_Lines table to be equal to [Add_Left_Odd.MIN_FROM_HOUSE_NUMBER].
13. Break the Join.
14. Create a Join from the Address_Lines table to the Add_Left_Odd table.
15. Select By Attribute on the joined table and with the Create a Selection option select the records where:
Address_Lines.SIDE_PARITY = Add_Left_Odd.SIDE_PARITY AND Add_Left_Odd.GOOD_BAD = 'Good' AND Address_Lines.TO_MEAS = Add_Left_Odd.MAX_TO_MEAS AND Add_Left_Odd.ASC_DESC = 'Ascending' AND Address_Lines.TO_HOUSE_NUMBER > Add_Left_Odd.MAX_TO_HOUSE_NUMBER
16. Break the Join.
17. From the Address_Line table perform the relate to get the matching record selection in the Add_Left_Odd table.
18. Start an edit session on the Add_Left_Odd table workspace.
19. Copy paste the highest TO_HOUSE_NUMBER of the Address_Lines selection to the MAX_TO_HOUSE_NUMBER of the Add_Left_Odd table on the matching RID values.
20. Recalculate the HOUSE_INTERVAL of the Add_Left_Odd table using the formula saved in
21. Save the edits when all are finished.
22. Create a Join from the Address_Lines table to the Add_Left_Odd table.
23. Select By Attribute on the joined table and with the Create a Selection option select the records where:
Address_Lines.SIDE_PARITY = Add_Left_Odd.SIDE_PARITY AND Add_Left_Odd.GOOD_BAD = 'Good' AND Address_Lines.TO_MEAS = Add_Left_Odd.MAX_TO_MEAS AND Add_Left_Odd.ASC_DESC = 'Ascending' AND Address_Lines.TO_HOUSE_NUMBER < Add_Left_Odd.MAX_TO_HOUSE_NUMBER
24. With the Field Calculator calculate the TO_HOUSE_NUMBER of the Addess_Lines table to be equal to [Add_Left_Odd.MAX_TO_HOUSE_NUMBER].
25. Break the Join.
26. Another check that can be done is to find instances where the extreme house numbers are inside the ends of the address range sets. After joining the line event table for the house pairs to one of the Add_... tables, this query can do that for Ascending routes for the Add_Left_Odd table on the Min_From_House_Number:
Address_Lines_Features.SIDE_PARITY = Add_Left_Odd.SIDE_PARITY AND Add_Left_Odd.GOOD_BAD = 'Good' AND Address_Lines_Features.ASC_DESC IN ('Ascending', 'Descending') AND Add_Left_Odd.ASC_DESC = 'Ascending' AND Address_Lines_Features.FROM_MEAS <> Add_Left_Odd.MIN_FROM_MEAS AND Address_Lines_Features.FROM_HOUSE_NUMBER = Add_Left_Odd.MIN_FROM_HOUSE_NUMBER
Validation of House Range End House Numbers for the Right Even Addresses
These steps apply to the Right Odd Addresses, and are listed out to make it easier to follow. However, basically this section is a repeat of the process listed under the Validation of House Range End House Numbers for the Left Even Addresses.
1. Create a Relate from the Add_Right_Even table to the Address_Lines table on the common RID field.
2. Create a Join from the Address_Lines table to the Add_Right_Even table.
3. Select By Attribute on the joined table and with the Create a Selection option select the records where:
Address_Lines.SIDE_PARITY = Add_Right_Even.SIDE_PARITY AND Add_Right_Even.GOOD_BAD = 'Good' AND Address_Lines.FROM_MEAS = Add_Right_Even.MIN_FROM_MEAS AND Add_Right_Even.ASC_DESC = 'Ascending' AND Address_Lines.FROM_HOUSE_NUMBER < Add_Right_Even.MIN_FROM_HOUSE_NUMBER
4. Break the Join.
5. From the Address_Line table perform the relate to get the matching record selection in the Add_Right_Even table.
6. Start an edit session on the Add_Right_Even table workspace.
7. Copy paste the lowest FROM_HOUSE_NUMBER of the Address_Lines selection to the MIN_FROM_HOUSE_NUMBER of the Add_Right_Even table on the matching RID values.
8. Recalculate the HOUSE_INTERVAL of the Add_Right_Even table using the formula saved in
9. Save the edits when all are finished.
10. Create a Join from the Address_Lines table to the Add_Right_Even table.
11. Select By Attribute on the joined table and with the Create a Selection option select the records where:
Address_Lines.SIDE_PARITY = Add_Right_Even.SIDE_PARITY AND Add_Right_Even.GOOD_BAD = 'Good' AND Address_Lines.FROM_MEAS = Add_Right_Even.MIN_FROM_MEAS AND Add_Right_Even.ASC_DESC = 'Ascending' AND Address_Lines.FROM_HOUSE_NUMBER > Add_Right_Even.MIN_FROM_HOUSE_NUMBER
12. With the Field Calculator calculate the FROM_HOUSE_NUMBER of the Addess_Lines table to be equal to [Add_Right_Even.MIN_FROM_HOUSE_NUMBER].
13. Break the Join.
14. Create a Join from the Address_Lines table to the Add_Right_Even table.
15. Select By Attribute on the joined table and with the Create a Selection option select the records where:
Address_Lines.SIDE_PARITY = Add_Right_Even.SIDE_PARITY AND Add_Right_Even.GOOD_BAD = 'Good' AND Address_Lines.TO_MEAS = Add_Right_Even.MAX_TO_MEAS AND Add_Right_Even.ASC_DESC = 'Ascending' AND Address_Lines.TO_HOUSE_NUMBER > Add_Right_Even.MAX_TO_HOUSE_NUMBER
16. Break the Join.
17. From the Address_Line table perform the relate to get the matching record selection in the Add_Right_Even table.
18. Start an edit session on the Add_Right_Even table workspace.
19. Copy paste the highest TO_HOUSE_NUMBER of the Address_Lines selection to the MAX_TO_HOUSE_NUMBER of the Add_Right_Even table on the matching RID values.
20. Recalculate the HOUSE_INTERVAL of the Add_Right_Even table using the formula saved in
21. Save the edits when all are finished.
22. Create a Join from the Address_Lines table to the Add_Right_Even table.
23. Select By Attribute on the joined table and with the Create a Selection option select the records where:
Address_Lines.SIDE_PARITY = Add_Right_Even.SIDE_PARITY AND Add_Right_Even.GOOD_BAD = 'Good' AND Address_Lines.TO_MEAS = Add_Right_Even.MAX_TO_MEAS AND Add_Right_Even.ASC_DESC = 'Ascending' AND Address_Lines.TO_HOUSE_NUMBER < Add_Right_Even.MAX_TO_HOUSE_NUMBER
24. With the Field Calculator calculate the TO_HOUSE_NUMBER of the Addess_Lines table to be equal to [Add_Right_Even.MAX_TO_HOUSE_NUMBER].
25. Break the Join.
26. Another check that can be done is to find instances where the extreme house numbers are inside the ends of the address range sets. After joining the line event table for the house pairs to one of the Add_... tables, this query can do that for Ascending routes for the Add_Left_Even table on the Min_From_House_Number:
Address_Lines_Features.SIDE_PARITY = Add_Right_Even.SIDE_PARITY AND Add_Right_Even.GOOD_BAD = 'Good' AND Address_Lines_Features.ASC_DESC IN ('Ascending', 'Descending') AND Add_Right_Even.ASC_DESC = 'Ascending' AND Address_Lines_Features.FROM_MEAS <> Add_Right_Even.MIN_FROM_MEAS AND Address_Lines_Features.FROM_HOUSE_NUMBER = Add_Right_Even.MIN_FROM_HOUSE_NUMBER
Validation of House Range End House Numbers for the Right Odd Addresses
These steps apply to the Right Odd Addresses, and are listed out to make it easier to follow. However, basically this section is a repeat of the process listed under the Validation of House Range End House Numbers for the Left Even Addresses.
1. Create a Relate from the Add_Odd_Even table to the Address_Lines table on the common RID field.
2. Create a Join from the Address_Lines table to the Add_Odd_Even table.
3. Select By Attribute on the joined table and with the Create a Selection option select the records where:
Address_Lines.SIDE_PARITY = Add_Right_Odd.SIDE_PARITY AND Add_Right_Odd.GOOD_BAD = 'Good' AND Address_Lines.FROM_MEAS = Add_Right_Odd.MIN_FROM_MEAS AND Add_Right_Odd.ASC_DESC = 'Ascending' AND Address_Lines.FROM_HOUSE_NUMBER < Add_Right_Odd.MIN_FROM_HOUSE_NUMBER
4. Break the Join.
5. From the Address_Line table perform the relate to get the matching record selection in the Add_Right_Odd table.
6. Start an edit session on the Add_Right_Odd table workspace.
7. Copy paste the lowest FROM_HOUSE_NUMBER of the Address_Lines selection to the MIN_FROM_HOUSE_NUMBER of the Add_Right_Odd table on the matching RID values.
8. Recalculate the HOUSE_INTERVAL of the Add_Right_Odd table using the formula saved in
9. Save the edits when all are finished.
10. Create a Join from the Address_Lines table to the Add_Right_Odd table.
11. Select By Attribute on the joined table and with the Create a Selection option select the records where:
Address_Lines.SIDE_PARITY = Add_Right_Odd.SIDE_PARITY AND Add_Right_Odd.GOOD_BAD = 'Good' AND Address_Lines.FROM_MEAS = Add_Right_Odd.MIN_FROM_MEAS AND Add_Right_Odd.ASC_DESC = 'Ascending' AND Address_Lines.FROM_HOUSE_NUMBER > Add_Right_Odd.MIN_FROM_HOUSE_NUMBER
12. With the Field Calculator calculate the FROM_HOUSE_NUMBER of the Addess_Lines table to be equal to [Add_Right_Odd.MIN_FROM_HOUSE_NUMBER].
13. Break the Join.
14. Create a Join from the Address_Lines table to the Add_Right_Odd table.
15. Select By Attribute on the joined table and with the Create a Selection option select the records where:
Address_Lines.SIDE_PARITY = Add_Right_Odd.SIDE_PARITY AND Add_Right_Odd.GOOD_BAD = 'Good' AND Address_Lines.TO_MEAS = Add_Right_Odd.MAX_TO_MEAS AND Add_Right_Odd.ASC_DESC = 'Ascending' AND Address_Lines.TO_HOUSE_NUMBER > Add_Right_Odd.MAX_TO_HOUSE_NUMBER
16. Break the Join.
17. From the Address_Line table perform the relate to get the matching record selection in the Add_Right_Odd table.
18. Start an edit session on the Add_Right_Odd table workspace.
19. Copy paste the highest TO_HOUSE_NUMBER of the Address_Lines selection to the MAX_TO_HOUSE_NUMBER of the Add_Right_Odd table on the matching RID values.
20. Recalculate the HOUSE_INTERVAL of the Add_Right_Odd table using the formula saved in
21. Save the edits when all are finished.
22. Create a Join from the Address_Lines table to the Add_Right_Odd table.
23. Select By Attribute on the joined table and with the Create a Selection option select the records where:
Address_Lines.SIDE_PARITY = Add_Right_Odd.SIDE_PARITY AND Add_Right_Odd.GOOD_BAD = 'Good' AND Address_Lines.TO_MEAS = Add_Right_Odd.MAX_TO_MEAS AND Add_Right_Odd.ASC_DESC = 'Ascending' AND Address_Lines.TO_HOUSE_NUMBER < Add_Right_Odd.MAX_TO_HOUSE_NUMBER
24. With the Field Calculator calculate the TO_HOUSE_NUMBER of the Addess_Lines table to be equal to [Add_Right_Odd.MAX_TO_HOUSE_NUMBER].
25. Break the Join.
26. Another check that can be done is to find instances where the extreme house numbers are inside the ends of the address range sets. After joining the line event table for the house pairs to one of the Add_... tables, this query can do that for Ascending routes for the Add_Right_Odd table on the Min_From_House_Number:
Address_Lines_Features.SIDE_PARITY = Add_Right_Odd.SIDE_PARITY AND Add_Right_Odd.GOOD_BAD = 'Good' AND Address_Lines_Features.ASC_DESC IN ('Ascending', 'Descending') AND Add_Right_Odd.ASC_DESC = 'Ascending' AND Address_Lines_Features.FROM_MEAS <> Add_Right_Odd.MIN_FROM_MEAS AND Address_Lines_Features.FROM_HOUSE_NUMBER = Add_Right_Odd.MIN_FROM_HOUSE_NUMBER
Extracting End Points from Centerlines
We now will begin to turn our attention to the process of transferring address range data to the Centerlines. To do that, we need to work with the end points of each centerline. This section explains how to get those end points.
1. If you have an Advanced license you can just use the Feature Vertices to Points tool with the Both Ends setting. This tool will extract the two end points of every centerline with the odd ObjectID records being the From End and even ObjectID values being the To End. This tool will create a field called ORIG_FID that contains the original OBJECTID values of each centerline. You must also add a field to this output called FROM_OR_TO that is text with 8 characters and calculate it to be:
a. Parser: VB Script
b. Show Codeblock: Checked
c. PreLogic Script Code:
If [OBJECTID] <> Round([OBJECTID] / 2, 0) * 2 Then
Output = “FROM_END”
Else
Output = “TO_END”
End If
d. FROM_OR_TO = Output (Just type the word Output in the expression text box)
2. If you do not have an Advanced license you can still extract the End Points, but it takes more steps.
a. To begin add a long field called ORIG_FID and calculate it to be equal to the OBJECTID field of the centerlines.
b. Add four double fields called X_FROM, Y_FROM, X_TO, and Y_TO.
c. Use the Geometry Calculator to calculate the X and Y of the Beginning and End of the line into the corresponding field. Alternatively, use the Field Calculator with the expression !Shape.FirstPoint.X!, !Shape.FirstPoint.Y!, !Shape.LastPoint.X!, !Shape.LastPoint.Y! respectively.
d. From the open table view Export the Centerline attributes to a standalone table called CL_Ends_Temp.
e. In the Table of Contents right click the CL_Ends_Temp table and choose the Display XY Events… context menu item to create a layer based on the FROM_X and FROM_Y fields.
f. Right click the first XY event layer (based on the X_FROM and Y_FROM fields) you just created in the Table of Contents and export it as a point feature class called CL_Ends.
g. In the CL_Ends feature class add a text field with 8 characters called FROM_OR_TO and Calculate its value to be: “FROM_END”
h. In the Table of Contents right click the CL_Ends_Temp table and choose the Display XY Events… context menu item to create a layer based on the TO_X and TO_Y fields.
e. Use the Append tool in the Data Management Tools toolbox in the General toolset to append the second XY Event Table (based on the X_TO and _Y_TO fields) to the CL_Ends point feature class using the NO_TEST option.
f. Select all records where the FROM_OR_TO field IS NULL and calculate those records to be: “TO_END”
Convert the Centerline End Points to Linear Referenced Point Events and Determine their orientation relative to the Routes.
1. Use the Locate Features Along Routes tool in the Linear Referencing Tools toolbox to create point events from the CL_Ends point feature class along your routes. Call the output CL_Ends_Locate. The search radius can be left at 0 and you should use the All route Locations option and include a distance field.
2. Select all events where the RID value does not equal the Centerline Route ID/Name and in an edit session delete those records.
3. Create a double field called END_MEAS and calculate it to be equal to the MEAS field to preserve the Measure values during the overlay processes that follows below.
4. Because the Centerlines may not be oriented with the direction of the Route, add an 8 characer text field called ROUTE_FROM_OR_TO.
5. Use the Summary Statistics tool on the CL_Ends_Locate table with the following Settings:
a. Output: CL_Lines
b. Summary Fields:
MEAS MIN
MEAS MAX
c. Case Fields:
RID
ORIG_FID
Any other fields that came from the original centerlines, excluding Meas or END_MEAS.
6. Join the CL_Ends_Locate as the primary table to the CL_Line_Events table on the common ORIG_FID fields.
a. Select all Ends where the CL_Ends_Locate.MEAS = CL_Line_Events.MIN_MEAS
b. Calculate the ROUTE_FROM_OR_TO field to be “FROM_END”
c. Select all Ends where the CL_Ends_Locate.MEAS = CL_Line_Events.MAX_MEAS
d. Calculate the ROUTE_FROM_OR_TO field to be “TO_END”
e. Verify that no ROUTE_FROM_OR_TO field has a NULL value due to any possible SQL precision errors affecting selection queries or because somehow two or more locations were matched by the locate process (usually due to Routes having non-monotonic measures). Fix any errors.
7. Break the Join.
8. Wherever FROM_OR_TO = ROUTE_FROM_OR_TO the centerline is oriented with the Route. Wherever FROM_OR_TO <> ROUTE_FROM_OR_TO the centerline is not oriented with the Route.
9. Create a Relate from the CL_Ends_Locate table to the CL_Line_Events on the ORIG_FID field. Perform each the above selections separately on the CL_Ends_Locate and apply the relate. Add a text field of 3 characters called ROUTE_ORIENTED to the CL_Line_Events table and calculate the matched orientation selection to “Yes” and the unmatched orientation routes to “No”.
Overlay the CL_Ends_Locate Events with the Address_Lines Events
1. Use the Overlay Route Events tool the Linear Referencing Tools toolbox with the following settings:
a. In_Table: CL_Ends_Locate
b. In_Event_Properties: RID, POINT, END_MEAS
c. Overlay_Table: Address_Lines
d. Overlay_Event_Properties: RID, LINE, MIN_MEAS, MAX_MEAS
e. Overlay_Type: Intersect
f. Out_Table: CL_Ends_Add_Lines
g. Out_Event_Properties: Default settings (rid, POINT, meas)
h. Fields: Keep all fields
i. Build_Index: Index
2. The output will only include those Centerline End Point events which fell between two address point events. Centerline end points which fell outside of the address point ranges will be processed separately later.
3. Add a Long Field Called House_Number to the output and calculate it to be equal to the following:
a. Parser: VB Script
b. Show Codeblock: Checked
c. PreLogic Script Code:
if [TO_MEAS] <> [FROM_MEAS] Then
If [ROUTE_FROM_OR_TO] = "FROM_END" Then
Raw_House = ( [TO_HOUSE_NUMBER] - [FROM_HOUSE_NUMBER] ) * ( [meas] - [FROM_MEAS] ) / ( [TO_MEAS] - [FROM_MEAS] ) + [FROM_HOUSE_NUMBER]
Int_House = Round(( [TO_HOUSE_NUMBER] - [FROM_HOUSE_NUMBER] ) * ( [meas] - [FROM_MEAS] ) / ( [TO_MEAS] - [FROM_MEAS] ) / 2, 0) * 2 + [FROM_HOUSE_NUMBER]
If [FROM_HOUSE_NUMBER] < [TO_HOUSE_NUMBER] Then
If Int_House < Raw_House Then
Output = Int_House + 2
Else
Output = Int_House
End If
Else
If Int_House > Raw_House Then
Output = Int_House - 2
Else
Output = Int_House
End If
End If
ElseIf [ROUTE_FROM_OR_TO] = "TO_END" Then
Raw_House = ( [TO_HOUSE_NUMBER] - [FROM_HOUSE_NUMBER] ) * ( [meas] - [FROM_MEAS] ) / ( [TO_MEAS] - [FROM_MEAS] ) + [FROM_HOUSE_NUMBER]
Int_House = Round(( [TO_HOUSE_NUMBER] - [FROM_HOUSE_NUMBER] ) * ( [meas] - [FROM_MEAS] ) / ( [TO_MEAS] - [FROM_MEAS] ) / 2, 0) * 2 + [FROM_HOUSE_NUMBER]
If [FROM_HOUSE_NUMBER] < [TO_HOUSE_NUMBER] Then
If Int_House < Raw_House Then
Output = Int_House
Else
Output = Int_House - 2
End If
Else
If Int_House > Raw_House Then
Output = Int_House
Else
Output = Int_House + 2
End If
End If
Else
Output = -1
End If
Else
Output = -1
End If
d. HOUSE_NUMBER = Output (Just type the word Output in the Expression text box)
4. Select and delete all records where the HOUSE_NUMBER = -1. These should be the locations where the measures did not change, typically at the ends of the Routes. Earlier steps should have ensured that the widest range of addresses applied at these locations.
5. Performed a Join with each of the Address Side Parity summaries (like Add_Left_Even) and selected all records that matched the given SIDE_PARITY value and that have an OBJECTID IS NULL for the joined table (meaning the addresses were not the predominant set for that side). Delete these records.
6. The overlay should have included the address range fields from your Centerline data. The range fields need to be either Long or Double fields, so if your normal ranges are text fields create new fields that are type Long.
7. Use the following calculation to calculate the L_F_ADD field (which is for the Left From Address field):
a. Parser: VB Script
b. Show Codeblock: Checked
c. Pre-Logic Script Code:
If ([SIDE_PARITY] = "LEFT_SIDE, EVEN_HOUSE" OR [SIDE_PARITY] = "LEFT_SIDE, ODD_HOUSE") AND [ROUTE_FROM_OR_TO] = "FROM_END" then
Output = [HOUSE_NUMBER]
Else
Output = -1
End If
d. L_F_ADD = Output (Just put the word Output in the expression text box)
e. If this is the first time you are doing the calculation save it with the Save Button for each of the range fields.
8. Use the following calculation to calculate the L_T_ADD field (which is for the Left To Address field):
a. Parser: VB Script
b. Show Codeblock: Checked
c. Pre-Logic Script Code:
If ([SIDE_PARITY] = "LEFT_SIDE, EVEN_HOUSE" OR [SIDE_PARITY] = "LEFT_SIDE, ODD_HOUSE") AND [ROUTE_FROM_OR_TO] = "TO_END" then
Output = [HOUSE_NUMBER]
Else
Output = -1
End If
d. L_T_ADD = Output (Just put the word Output in the expression text box)
e. If this is the first time you are doing the calculation save it with the Save Button for each of the range fields.
9. Use the following calculation to calculate the R_F_ADD field (which is for the Right From Address field):
a. Parser: VB Script
b. Show Codeblock: Checked
c. Pre-Logic Script Code:
If ([SIDE_PARITY] = "RIGHT_SIDE, EVEN_HOUSE" OR [SIDE_PARITY] = "RIGHT_SIDE, ODD_HOUSE") AND [ROUTE_FROM_OR_TO] = "FROM_END" then
Output = [HOUSE_NUMBER]
Else
Output = -1
End If
d. R_F_ADD = Output (Just put the word Output in the expression text box)
e. If this is the first time you are doing the calculation save it with the Save Button for each of the range fields.
10. Use the following calculation to calculate the R_T_ADD field (which is for the Right To Address field):
a. Parser: VB Script
b. Show Codeblock: Checked
c. Pre-Logic Script Code:
If ([SIDE_PARITY] = "RIGHT_SIDE, EVEN_HOUSE" OR [SIDE_PARITY] = "RIGHT_SIDE, ODD_HOUSE") AND [ROUTE_FROM_OR_TO] = "TO_END" then
Output = [HOUSE_NUMBER]
Else
Output = -1
End If
d. R_T_ADD = Output (Just put the word Output in the expression text box)
e. If this is the first time you are doing the calculation save it with the Save Button for each of the range fields.
11. You can use the Display Route Events context menu item on the output to create a point event layer showing the centerline segment end points. If you calculated a FROM_DISTANCE and TO_DISTANCE field in your Address lines, use that value for the side offset. The layer coloring can import the settings of the Address points
8. Here is how my particular layer looked:
Creating Address Ranges on the Centerlines
1. Create Address Range fields in the CL_Lines event table which are type Long. The field names I used were L_F_ADD_LONG, L_T_ADD_LONG, R_F_ADD_LONG and R_T_ADD_LONG. Calculate the initial value of all of these fields to -1.
2. Perform a summary of the overlay table to get the transferrable house numbers at the centerline segment ends that were actually between the address points using the Summary Statistics tool with the following settings:
a. Summary fields
L_F_ADD Max
L_T_ADD Max
R_F_ADD Max
R_T_ADD Max
b. Case Fields
RID
ORIG_FID
3. Join the CL_LINES table as the master table to the summary output as the join table and select the records where the join records actually exist. Then transfer the result to the CL_Lines table with the Field Calculator.
4. Create a line layer from the CL_Lines table using the Display Route Events and put the following definition query on it to only show the fully addressed lines:
a. "L_F_ADD_LONG" > -1 AND "L_T_ADD_LONG" > -1 AND "R_F_ADD_LONG" > -1 AND "R_T_ADD_LONG" > -1
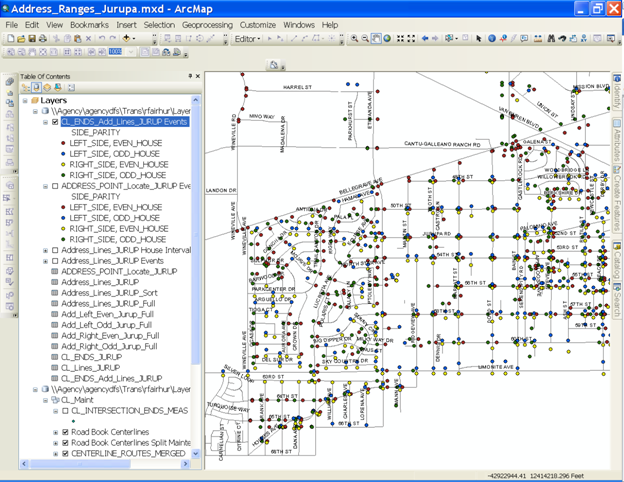
5. Create another line layer from the CL_Lines table using the Display Route Events and put the following definition query on it to only show the partially addressed lines:
a. ("L_F_ADD_LONG" > -1 OR "L_T_ADD_LONG" > -1 OR "R_F_ADD_LONG" > -1 OR "R_T_ADD_LONG" > -1) AND NOT ("L_F_ADD_LONG" > -1 AND "L_T_ADD_LONG" > -1 AND "R_F_ADD_LONG" > -1 AND "R_T_ADD_LONG" > -1)
6. Rename the two layers to make it clear what they are showing.
7. Make the two line event layers distinct colors from each other and adjust the symbology settings to make them stand out.
8. Here is the result of how I displayed my two event layers with dark red lines being fully addressed centerlines and pink lines being partially addressed centerlines. The grey lines have no address and are the original centerlines used as background layer.

9. Join the CL_Lines table as the primary table to the Add_Left_Even table on the common RID fields.
10. Select the records where Add_Left_Even.OBJECTID > -1 AND CL_Lines.L_F_ADD_LONG = -1
11. Calculate the L_F_ADD field with the following calculation:
a. Parser: VB Script
b. Show Codeblock: Checked
c. Pre-Logic Script Code:
Min_Meas = [CL_LINES.MIN_MEAS]
Asc_Desc = [Add_Left_Even.ASC_DESC]
Min_Min_Meas = [Add_Left_Even.MIN_FROM_MEAS]
Max_Max_Meas = [Add_Left_Even.MAX_TO_MEAS]
House_Interval = [Add_Left_Even.HOUSE_INTERVAL]
Min_From_House_Number = [Add_Left_Even.MIN_FROM_HOUSE_NUMBER]
Max_To_House_Number = [Add_Left_Even.MAX_TO_HOUSE_NUMBER]
Max_From_House_Number = [Add_Left_Even.MAX_FROM_HOUSE_NUMBER]
Min_To_House_Number = [Add_Left_Even.MIN_TO_HOUSE_NUMBER]
If Asc_Desc = "Ascending" AND Min_Meas < Min_Min_Meas Then
Raw = (Min_Meas - Min_Min_Meas) / House_Interval + Min_From_House_Number
Output = Round((Min_Meas - Min_Min_Meas) / House_Interval/2, 0) * 2 + Min_From_House_Number
If Output < Raw Then Output = Output + 2
ElseIf Asc_Desc = "Ascending" AND Min_Meas > Max_Max_Meas Then
Raw = (Min_Meas - Max_Max_Meas) / House_Interval + Max_To_House_Number
Output = Round((Min_Meas - Max_Max_Meas) / House_Interval/2, 0) * 2 + Max_To_House_Number
If Output < Raw Then Output = Output + 2
ElseIf Asc_Desc = "Descending" AND Min_Meas < Min_Min_Meas Then
Raw = (Min_Meas - Min_Min_Meas) / House_Interval + Max_From_House_Number
Output = Round((Min_Meas - Min_Min_Meas) / House_Interval/2, 0) * 2 + Max_From_House_Number
If Output > Raw Then Output = Output - 2
ElseIf Asc_Desc = "Descending" AND Min_Meas > Max_Max_Meas Then
Raw = (Min_Meas - Max_Max_Meas) / House_Interval + Min_To_House_Number
Output = Round((Min_Meas - Max_Max_Meas) / House_Interval/2, 0) * 2 + Min_To_House_Number
If Output > Raw Then Output = Output - 2
Else
Output = -1
End If
d. L_F_ADD = Output (Just type the word Output in the expression text box)
12. Select the records where Add_Left_Even.OBJECTID > -1 AND CL_Lines.L_T_ADD_LONG = -1
13. Calculate the L_T_ADD field with the following calculation:
a. Parser: VB Script
b. Show Codeblock: Checked
c. Pre-Logic Script Code:
Max_Meas = [CL_Lines.MAX_MEAS]
Asc_Desc = [Add_Left_Even.ASC_DESC]
Min_Min_Meas = [Add_Left_Even.MIN_FROM_MEAS]
Max_Max_Meas = [Add_Left_Even.MAX_TO_MEAS]
House_Interval = [Add_Left_Even.HOUSE_INTERVAL]
Min_From_House_Number = [Add_Left_Even.MIN_FROM_HOUSE_NUMBER]
Max_To_House_Number = [Add_Left_Even.MAX_TO_HOUSE_NUMBER]
Max_From_House_Number = [Add_Left_Even.MAX_FROM_HOUSE_NUMBER]
Min_To_House_Number = [Add_Left_Even.MIN_TO_HOUSE_NUMBER]
If Asc_Desc = "Ascending" AND Max_Meas < Min_Min_Meas Then
Raw = (Max_Meas - Min_Min_Meas) / House_Interval + Min_From_House_Number
Output = Round((Max_Meas - Min_Min_Meas) / House_Interval/2, 0) * 2 + Min_From_House_Number
If Output > Raw Then Output = Output - 2
ElseIf Asc_Desc = "Ascending" AND Max_Meas > Max_Max_Meas Then
Raw = (Max_Meas - Max_Max_Meas) / House_Interval + Max_To_House_Number
Output = Round((Max_Meas - Max_Max_Meas) / House_Interval/2, 0) * 2 + Max_To_House_Number
If Output > Raw Then Output = Output - 2
ElseIf Asc_Desc = "Descending" AND Max_Meas < Min_Min_Meas Then
Raw = (Max_Meas - Min_Min_Meas) / House_Interval + Max_From_House_Number
Output = Round((Max_Meas - Min_Min_Meas) / House_Interval/2, 0) * 2 + Max_From_House_Number
If Output < Raw Then Output = Output + 2
ElseIf Asc_Desc = "Descending" AND Max_Meas > Max_Max_Meas Then
Raw = (Max_Meas - Max_Max_Meas) / House_Interval + Min_To_House_Number
Output = Round((Max_Meas - Max_Max_Meas) / House_Interval/2, 0) * 2 + Min_To_House_Number
If Output < Raw Then Output = Output + 2
Else
Output = -1
End If
d. L_T_ADD = Output (Just type the word Output in the expression text box)
14. Break the Join
15. Join the CL_Lines table as the primary table to the Add_Left_Odd table on the common RID fields.
16. Repeat steps 9 through 13 changing all references to the Add_Left_Even table to the Add_Left_Odd table.
17. Join the CL_Lines table as the primary table to the Add_Right_Even table on the common RID fields.
18. Repeat steps 9 through 13 changing all references to the Add_Left_Even table to the Add_Right_Even table and the references to L_F_ADD to R_F_ADD and the references to L_T_ADD to R_T_ADD.
19. Join the CL_Lines table as the primary table to the Add_Right_Odd table on the common RID fields.
20. Repeat steps 9 through 13 changing all references to the Add_Left_Even table to the Add_Right_Odd table and the references to L_F_ADD to R_F_ADD and the references to L_T_ADD to R_T_ADD.
21. This shows the result for my data in the 2 layers that were set up in step 7 of this section:
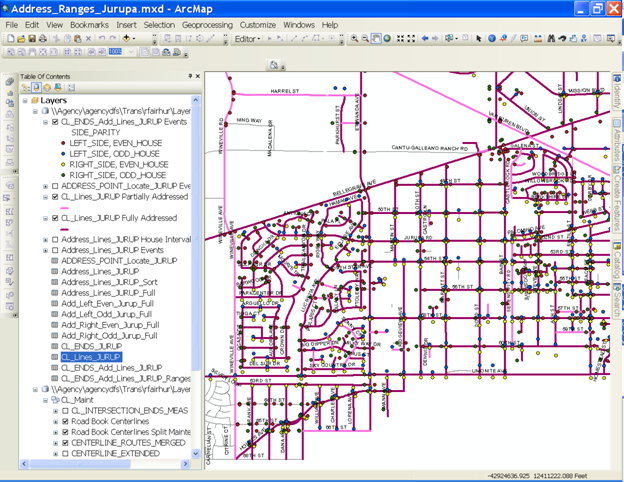
22. The remaining roads that have been addressed on one side of the road you can simply be duplicate the address ranges of the addressed side over to the unassigned side with a one house adjustment for parity.
23. Select all CL_Lines records where "L_F_ADD " <> -1 AND "L_T_ADD " <> -1 AND "R_F_ADD " = -1 AND "R_T_ADD " = -1
24. Calculate the R_F_ADD to be equal to [L_F_ADD] + 1
25. Calculate the R_T_ADD to be equal to [L_T_ADD] + 1
26. Select all CL_Lines records where "R_F_ADD " <> -1 AND "R_T_ADD " <> -1 AND "L_F_ADD " = -1 AND "L_T_ADD " = -1
27. Calculate the L_F_ADD to be equal to [R_F_ADD] - 1
28. Calculate the L_T_ADD to be equal to [R_T_ADD] – 1
29. The remaining roads that have -1 for the address ranges there was either no house numbers or no more than one house number on any side of the road.
30. Here is the map showing the final assignment of ranges to all roads that could be addressed based on actual address points:

31. The address ranges should be inspected for any oddities, such as negative house number (other than -1). This could indicate that a bad range was not deleted previously from the Full event tables or that an anomalous house number was not deal with correctly during previous validation steps.
32. Select the records where there is a wide spread between the sides. This could indicate that one side had too few addresses near the ends of the road and the house interval was too large or too small relative to the side with more addresses or some other unusual addressing pattern for that particular road. Select these records using a query like this:
ABS(CL_Lines.L_F_ADD - CL_Lines.R_F_ADD) > 200 OR ABS(CL_Lines.L_T_ADD - CL_Lines.R_T_ADD) > 200
33. It may be best to select all parts of these records and return to step 10 to get only actual address values and then manually fix and fill in these ranges in an edit session.
34. Once the records are validated join the the original Centerlines as the primary table and the CL_Lines table as the join table on the Orig_FID field and calculate the final ranges into the centerline’s house number fields. If you prefer you can select only the records with house numbers greater than -1 and just calculate over those address ranges.
You must be a registered user to add a comment. If you've already registered, sign in. Otherwise, register and sign in.