- Home
- :
- All Communities
- :
- Products
- :
- ArcGIS AppStudio
- :
- ArcGIS AppStudio Blog
- :
- Tutorial - Load a Web Map and Display Device Locat...
Tutorial - Load a Web Map and Display Device Location
- Subscribe to RSS Feed
- Mark as New
- Mark as Read
- Bookmark
- Subscribe
- Printer Friendly Page
- Report Inappropriate Content
In this tutorial, you will learn how to quickly create a native app that loads a public Web Map and display current device location on a map using AppStudio for ArcGIS. We will take advantage of ArcGIS Runtime for the mapping, one of the five ready-to-use Material Design Layouts available for the app and device GPS for location.
Time required: 10 - 20 mins (if the prerequisite software is installed)
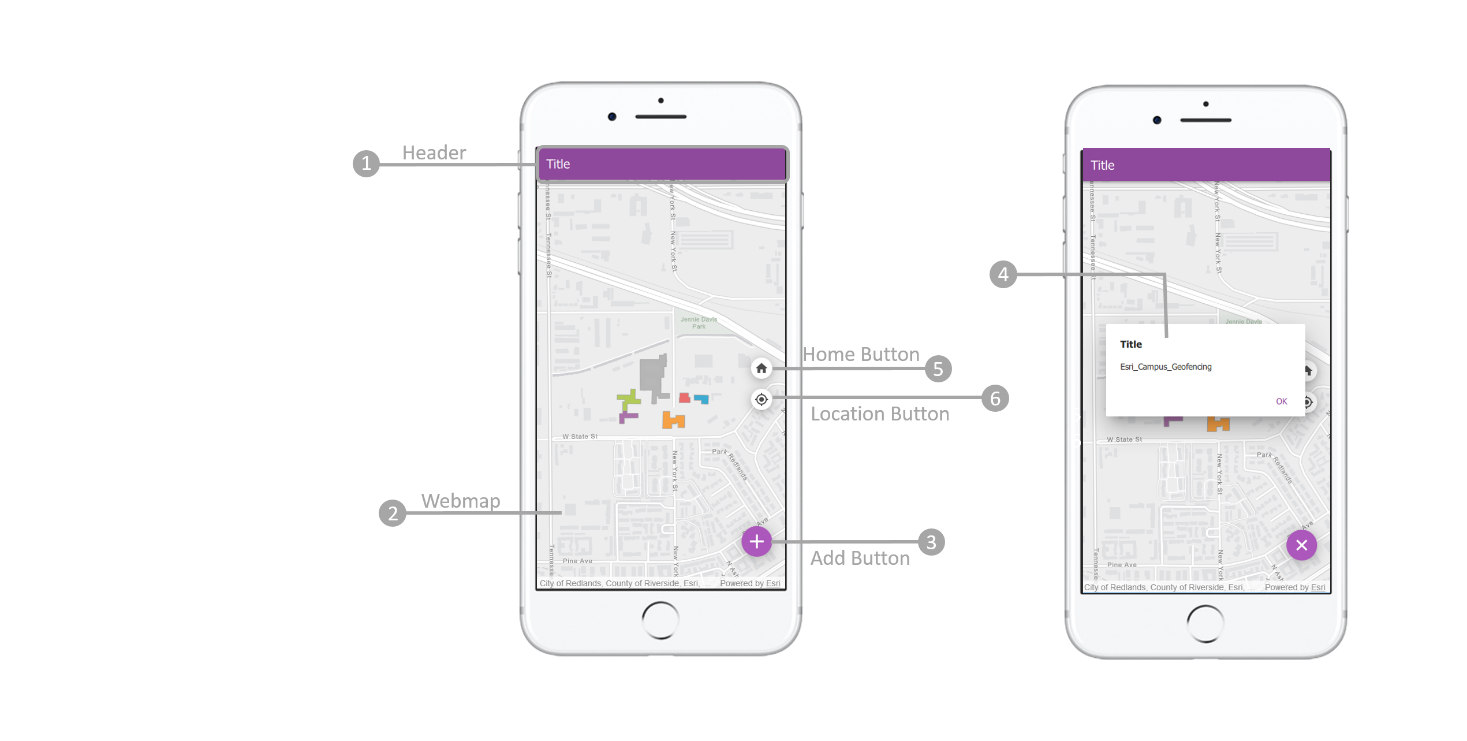
You will create an app that looks like the illustration below, the main features of this app include:
- Load a public Web Map
- Tap on the Add button to display Web Map name on a pop-up
- Tap on the Home button to return to the initial Web Map extent
- Tap on the Location button to display the current device location
Final result:
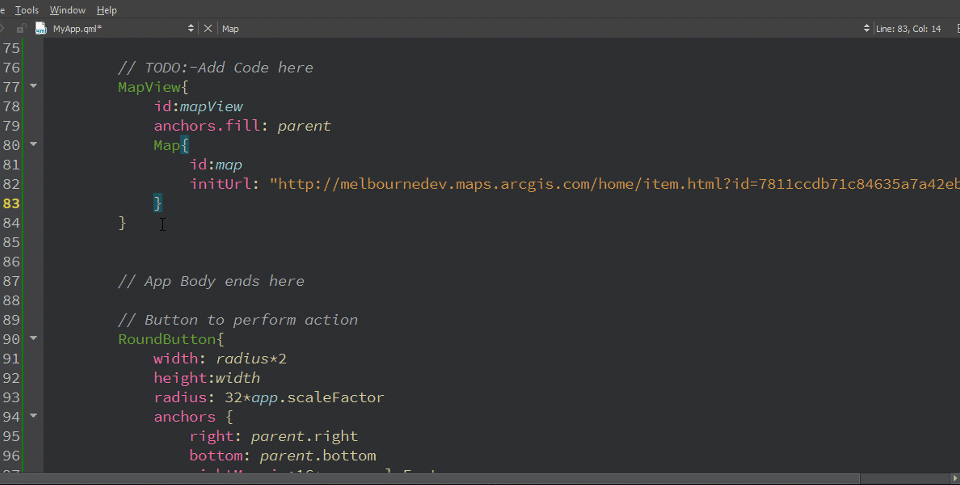
Code behind:

Getting ready:
- You will need AppStudio Desktop (Standard). If you are new or have not yet licensed AppStudio Standard please watch this tutorial to get started with a trial account.
- You will need to download resources (attachment) to follow the tutorial.
Step 0. Create a new App:
Let’s start from one of the readily available layouts in the AppStudio Desktop called "Simple Layout(Material Design)".
- Open AppStudio Desktop
- Click on the New App Button
- Click on the Layout tab
- Choose Simple Layout (Material Design) and click on the Create button
- Once the app is created, click on the Edit Title icon on the top of the side panel to rename the app. We can call it "My first app", click on the Save Changes icon.
- Click on the Edit icon on the side panel to open the Qt Creator IDE
- By default, the first QML file used by the app will be loaded into the Editor (MyApp.qml)
Step1. Import statements
You can tell the app which modules, components, or plugins you want to use by adding an import statement. For example, to use the material style in the app, we need to add the import statement import QtQuick.Controls.Material 2.1. In this step, you need to add three more import statements in order to use ArcGIS Runtime as well as enable location-based function.
//ArcGIS Runtime
import Esri.ArcGISRuntime 100.1
//GPS
import QtPositioning 5.8
import QtSensors 5.2Step 2. Change primary color property.
Material primary color can be used to develop your branding color. Material accent color holds the accent of the theme, it can be same as the primary color. In this step, let’s change the primary color from "#3F51B5" to "#8f499c"
readonly property color primaryColor: "#8f499c"Keyboard shortcuts to save changes Windows: Ctrl + S MacOS: command + S Keyboard shortcuts to run apps in Qt Creator Windows: Shift + Alt + R MacOS: shift + option + R
Your app should look like this at this point

Step 3. Header
The Simple Material Design Layout already has a header on it, therefore, we do not need to add any additional code in this step. I want to point out that ToolBar QML type is used to define the header. The header height is 56 units and the background color is Material.Primary color. Inside the ToolBar, RowLayout QML type was used to position the contents.
Step 4. Load a Public Web Map
In this step we will be adding a map to the app using ArcGIS Runtime. Remember that the import was added earlier in Step 1.
The MapView is a virtual class from the ArcGIS Runtime that renders data in a map and allows users to interact with the map. The initUrl property inside the Map QML type is used to initialize the web map. The initUrl can be item details page url, map view page url, or sharing data url.
Please add the following code below the comment // TODO:-Add Code here to the MyApp.qml file
MapView{
id:mapView
anchors.fill: parent
Map{
id:map
initUrl: "http://www.arcgis.com/home/item.html?id=7811ccdb71c84635a7a42eb020403615"
}
}Step 5. Add Web Map Name to the Pop-Up
Let us replace the default text shown while clicking on the Add icon with the Web Map title. To do this, go to Dialog component and replace the Label text property with the following code. Note that the value is a property binding to the item title of the webmap as loaded by the Map (this is really awesome and so convenient. QML rocks!!!)
text: qsTr(mapView.map.item.title) 
Your app should look like this at this point

Step 6. Add Float Action Button Component
Now let's change gears a bit and try to structure our app by using re-usable components for the UI like buttons.
In QML, any snippet of code may become a reusable component. A file-based component is created by putting a QML element into a separate QML file. The file name is the element name and you can use the component by calling its file name. I have created a file-based reusable float action button component for Home button and Location button. The attached folder contains reusable component file FloatActionButton.qml. Once you have downloaded the attachment, you can add this file to the app project. To do this, go to AppStudio Desktop and choose the app that you are working on
- Click on the Files icon on the side panel
- Create a new folder and name it “controls”
- Copy and Paste FloatActionButton.qml file to the “controls” folder
You should be able to see this in the Qt Creator

Now that the FloatArctionButton component is added to the project, you might wonder how to use it? First of all, you need to add the import statement. After that, you can directly call the file name which is same as the component name FloatActionButton in the main file (MyApp.qml) to use the Float Action Button component.
import "controls"Step 7. Add Home Button and location Button Image
The next step is adding the Home button and Location button image to this project. (please find images in the attached folder) To do this,
- Go to AppStudio Desktop and choose the app that we are working on.
- Click on the Files icon on the side panel
- Copy and paste home.png and location.png to the assets folder.
You should see this in the Qt Creator

Step 8. Add Home Button
We will use a positioning elements ColumnLayout to arrange Home button and Location button by stacking them on top of each other. Let’s add the following syntax inside the MapView QML type and below the Map QML type.
ColumnLayout{
anchors{
right: parent.right
rightMargin: 16 * scaleFactor
verticalCenter: parent.verticalCenter
}
}
Inside the ColumnLayout QML type, let’s add the Home button by calling the Float Action Button component name FloatActionButton. Please add the following code. Note that when clicking on the Home button, we will call the setViewpointWithAnimationCurve method, it is used to return to initial Web Map extent. The first parameter of this method map.initialViewpoint sets the viewpoint, the second parameter 1.0 is the number of animation seconds, and the last parameter Enums.AnimationCurveEaseInOutCubic is a type of animation.
FloatActionButton{
id:homeButton
imageSource: "./assets/home.png"
onIced: {
mapView.setViewpointWithAnimationCurve(map.initialViewpoint, 1.0, Enums.AnimationCurveEaseInOutCubic)
}
} 
Your app should look like this at this point

Step 9. Set Up Location Source
In this step, we need to set up location source by adding LocationDisplay QML Type. PositionSource is used to provide the device’s current position. The import for this was already added in Step 1. Please insert the following code below the ColumnLayout QML type.
locationDisplay {
positionSource: PositionSource {
}
}
Step 10. Add Location Button
The last step is to add a Location button below the Home button by adding the following code. Note that there are three different location display modes in the ArcGIS Runtime. In this case, we are using Enums.LocationDisplayAutoPanModeRecenter.
FloatActionButton{
id:locationButton
imageSource: "./assets/location.png"
onIced: {
if (!mapView.locationDisplay.started) {
mapView.locationDisplay.start()
mapView.locationDisplay.autoPanMode = Enums.LocationDisplayAutoPanModeRecenter
colorOverlay.color = "steelblue"
}else {
mapView.locationDisplay.stop()
colorOverlay.color = "#4c4c4c"
}
}
}
Since this is an ArcGIS Runtime based app do not forget to add a free lite license (check the tip below, it's pretty easy)
To set a free Runtime Lite license (remove watermark from the map):
1. Click on the Settings icon on the side panel
2. Click on the Advanced button
3. Click on the Set Lite License button and Close Advanced Settings
4. Click on the Apply button
And that it, it is that easy to create your own mapping application with AppStudio. Now you can use AppStudio Player to test the app on different devices and also use Cloud Make to build executables of your app to distribute them in the store or within your own enterprise/business.
Interested to learn more about how to write similar apps as in this tutorial or even more advanced desktop or mobile apps with AppStudio, then you will not want to miss watching and learning from the recent recordings from the two-day workshop (Yes its free  ). Here is the link for about 12 hours of content to become an expert in writing apps. Happy coding!
You must be a registered user to add a comment. If you've already registered, sign in. Otherwise, register and sign in.