Turn on suggestions
Auto-suggest helps you quickly narrow down your search results by suggesting possible matches as you type.
Cancel
- Home
- :
- All Communities
- :
- Products
- :
- Viewer for Silverlight (Retired)
- :
- Viewer for Silverlight
- :
- Published model fails to work in the Web (Silverli...
Options
- Subscribe to RSS Feed
- Mark Topic as New
- Mark Topic as Read
- Float this Topic for Current User
- Bookmark
- Subscribe
- Mute
- Printer Friendly Page
Published model fails to work in the Web (Silverlight),
Subscribe
3230
9
04-09-2013 01:33 PM
by
Anonymous User
Not applicable
04-09-2013
01:33 PM
- Mark as New
- Bookmark
- Subscribe
- Mute
- Subscribe to RSS Feed
- Permalink
- Report Inappropriate Content
Original User: Jamal432@gmail.com
Published model fails to work in the Web (Silverlight),
I got a very simple model that selects the parcels based on their ID.
1. This model works fine on the desktop and does select the parcel based on its ID
[ATTACH=CONFIG]23351[/ATTACH], [ATTACH=CONFIG]23352[/ATTACH]
2. This model is successfully published as geoprocessing service
[ATTACH=CONFIG]23353[/ATTACH]
3. The model is added as geoprocessing service to the silverligth.
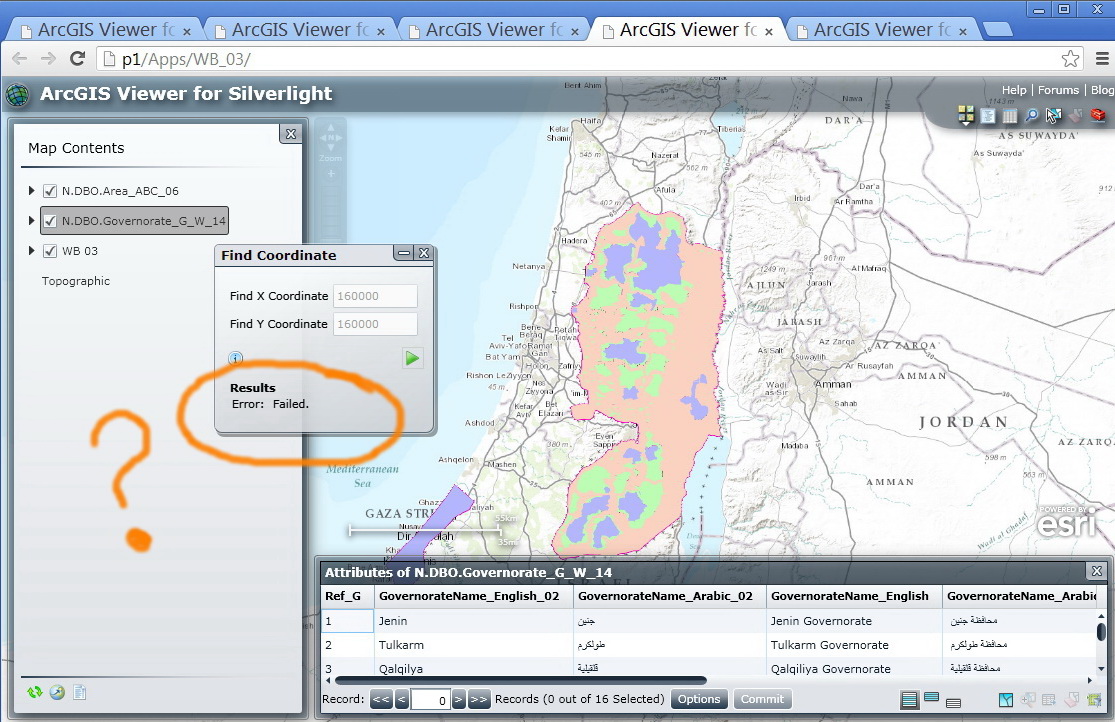
4. As the geoprocessing is executed in the Silverlight, nothing is selected and an exclamation mark is obtained.
[ATTACH=CONFIG]23354[/ATTACH]
What might be the issue then?
How this model does work on the desktop but not on the Web (Silverlight)?
The data and model are attached
Thank you
Best
Jamal
Published model fails to work in the Web (Silverlight),
I got a very simple model that selects the parcels based on their ID.
1. This model works fine on the desktop and does select the parcel based on its ID
[ATTACH=CONFIG]23351[/ATTACH], [ATTACH=CONFIG]23352[/ATTACH]
2. This model is successfully published as geoprocessing service
[ATTACH=CONFIG]23353[/ATTACH]
3. The model is added as geoprocessing service to the silverligth.
4. As the geoprocessing is executed in the Silverlight, nothing is selected and an exclamation mark is obtained.
[ATTACH=CONFIG]23354[/ATTACH]
What might be the issue then?
How this model does work on the desktop but not on the Web (Silverlight)?
The data and model are attached
Thank you
Best
Jamal
9 Replies
by
Anonymous User
Not applicable
04-10-2013
04:24 AM
- Mark as New
- Bookmark
- Subscribe
- Mute
- Subscribe to RSS Feed
- Permalink
- Report Inappropriate Content
Original User: tereshenkov
Jamal, when you run the Select By Attributes GP tool in ArcMap, it is aware of the feature class and the selection that is being made. ArcMap then takes care of highlighting the features selected. This GP tool cannot be used as it is in the GP service. You should modify the model to get the selected features as a output feature class that (you can use the option in the GP service settings to use result map service to draw the results; NB: only works in the async mode).
If you are interested in selecting features from a feature layer you add to the Viewer, please consider testing an add-in for Viewer that handles this logic. Python can be used here as well as outlined in this thread: http://forums.arcgis.com/threads/51800-Add-a-Geoprocessing-Select-by-attribute-and-zoom-to-feature. I've posted some information on publishing a single field geocode service where one can search features based on the field value earlier, too.
04-10-2013
01:39 PM
- Mark as New
- Bookmark
- Subscribe
- Mute
- Subscribe to RSS Feed
- Permalink
- Report Inappropriate Content
Jamal, when you run the Select By Attributes GP tool in ArcMap, it is aware of the feature class and the selection that is being made. ArcMap then takes care of highlighting the features selected. This GP tool cannot be used as it is in the GP service. You should modify the model to get the selected features as a output feature class that (you can use the option in the GP service settings to use result map service to draw the results; NB: only works in the async mode).
If you are interested in selecting features from a feature layer you add to the Viewer, please consider testing an add-in for Viewer that handles this logic. Python can be used here as well as outlined in this thread: http://forums.arcgis.com/threads/51800-Add-a-Geoprocessing-Select-by-attribute-and-zoom-to-feature. I've posted some information on publishing a single field geocode service where one can search features based on the field value earlier, too.
Thank you very much Alexey for the very informative answer,
Unfortunately, I�??m not a developer to play with codes and that sounds to be an issue when working with web application even the ones designed for the non-developers (Viewer Flex, Viewer Silverlight, .Net framework)
1. I couldn�??t figure out how to solve this issue! What my model should include to work fine on the web?
2. Previously, Mr. �??Ian Peebles�?� provided a code to plot multiple (x,y) coordinates on the web. But unfortunately, it did not work on my web application. The Python code and instructions are attached.
http://forums.arcgis.com/threads/78352-Displaying-more-than-one-
Please, in case your time permits, may you please try it and let me know if it works with your web? This is a very crucial tool in my workflow
[ATTACH=CONFIG]23392[/ATTACH]
Sounds we will be struggling to have even the very basic tools like �??search�?� and �??go to xy�?�!
Best
Jamal
----------------------------------------
Jamal Numan
Geomolg Geoportal for Spatial Information
Ramallah, West Bank, Palestine
Jamal Numan
Geomolg Geoportal for Spatial Information
Ramallah, West Bank, Palestine
by
Anonymous User
Not applicable
04-12-2013
11:01 AM
- Mark as New
- Bookmark
- Subscribe
- Mute
- Subscribe to RSS Feed
- Permalink
- Report Inappropriate Content
Original User: tereshenkov
Jamal, I have found recently a great Query Add-in Esri has just released a couple of weeks ago. It looks almost the same as the Query task we had in WMA in Server 9.3. I don't think you need to try get your model working - just download the add-in and enjoy!
Ready-to-use query tool for the ArcGIS Viewer for Silverlight
http://www.arcgis.com/home/item.html?id=451259f8e47440f2b727442fe1b2f7c2
04-14-2013
01:02 PM
- Mark as New
- Bookmark
- Subscribe
- Mute
- Subscribe to RSS Feed
- Permalink
- Report Inappropriate Content
Jamal, I have found recently a great Query Add-in Esri has just released a couple of weeks ago. It looks almost the same as the Query task we had in WMA in Server 9.3. I don't think you need to try get your model working - just download the add-in and enjoy!
Ready-to-use query tool for the ArcGIS Viewer for Silverlight
http://www.arcgis.com/home/item.html?id=451259f8e47440f2b727442fe1b2f7c2
Many thanks Alexey,
I�??ll be trying it and see if it works for me
Best
Jamal
----------------------------------------
Jamal Numan
Geomolg Geoportal for Spatial Information
Ramallah, West Bank, Palestine
Jamal Numan
Geomolg Geoportal for Spatial Information
Ramallah, West Bank, Palestine
04-18-2013
12:22 PM
- Mark as New
- Bookmark
- Subscribe
- Mute
- Subscribe to RSS Feed
- Permalink
- Report Inappropriate Content
Jamal, I have found recently a great Query Add-in Esri has just released a couple of weeks ago. It looks almost the same as the Query task we had in WMA in Server 9.3. I don't think you need to try get your model working - just download the add-in and enjoy!
Ready-to-use query tool for the ArcGIS Viewer for Silverlight
http://www.arcgis.com/home/item.html?id=451259f8e47440f2b727442fe1b2f7c2
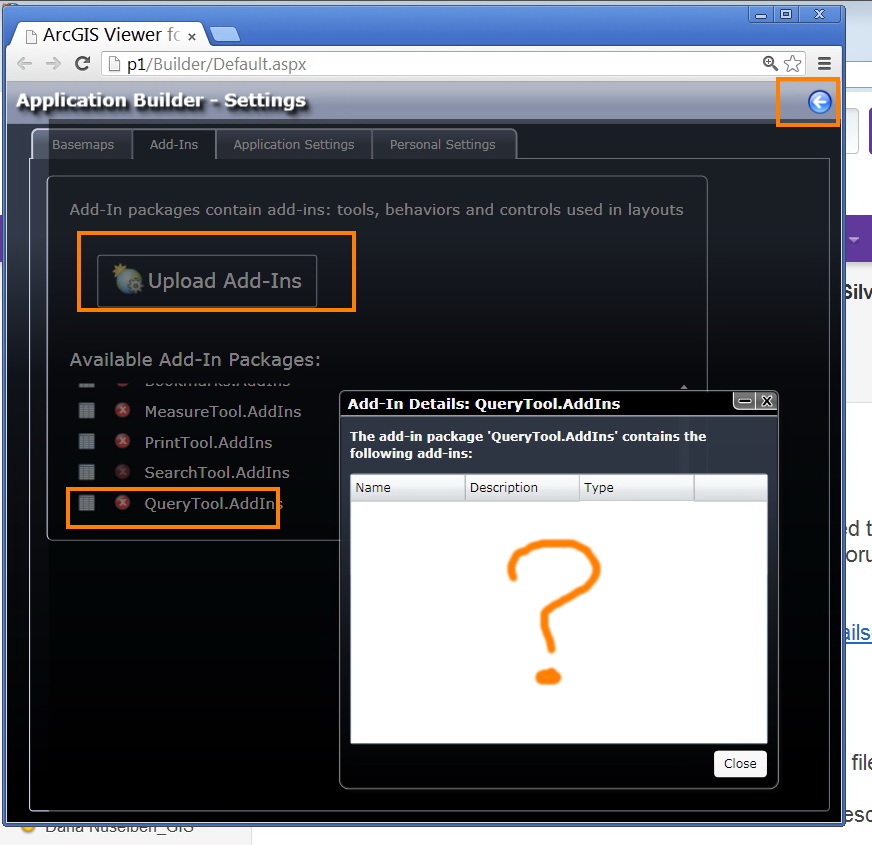
Hi Alexey,
I�??ve added the tool but it is not appearing anywhere in the application!
[ATTACH=CONFIG]23616[/ATTACH]
Where I�??m supposed to have it?
[ATTACH=CONFIG]23617[/ATTACH]
Best
Jamal
----------------------------------------
Jamal Numan
Geomolg Geoportal for Spatial Information
Ramallah, West Bank, Palestine
Jamal Numan
Geomolg Geoportal for Spatial Information
Ramallah, West Bank, Palestine
by
Anonymous User
Not applicable
04-18-2013
10:25 PM
- Mark as New
- Bookmark
- Subscribe
- Mute
- Subscribe to RSS Feed
- Permalink
- Report Inappropriate Content
Original User: tereshenkov
Jamal, there is a small user guide that is included in the .zip file you download. From this file:
Deploy, enable, use, and debug the Query Tool add-in as describled in the sections below.
===================
Tool deployment
===================
1.) Open the ArcGIS Viewer for Silverlight's Application Builder
2.) In the Application Builder, click Settings
3.) On the Settings page, click the Add-Ins tab.
4.) On the Add-Ins tab, click the Upload Add-In button.
5.) In the Open File dialog, browse to the QueryTool.AddIns.xap file (included with the sample) and double-click it.
Once these steps are complete, the Query Tool will be available in the Application Builder for users to add to their Viewer Applications.
=====================================================
Enabling the Query Tool in a Viewer application
=====================================================
1.) From the Application Builder home page, start creating a new Viewer application by clicking the Create New Application button.
2.) Choose the map you wish to start with in your Viewer application.
3.) On the Tools tab of the Application Builder's toolbar, click the Add Tool button.
4.) In the Add Tool dialog, select the Query Layer tool from the Query category and click Next.
5.) Define the tool's toolbar, label, toolbar, and icon as desired. Then click Next.
6.) Specify the URL to the layer to query and click connect. The URL must be to a layer or table within a map or feature service, such as http://serverapps10.esri.com/ArcGIS/rest/services/California/MapServer/1. Once the connection completes, click Next.
7.) Choose the field and operator to use for the query statement. Optionally, you may specify a default value or a list of values to choose from. Then click Next.
8.) To add another query statement, click the Add New link. Otherwise, click the Next button.
9.) Specify the desired options for the behavior of the query tool and click Next.
10.) Specify the tool's dialog title and labels. Optionally, query statements can be hidden by unchecking the associated checkbox. Click OK to complete tool configuration.
==========================
Using the Query Tool
==========================
1.) Click the Query Layer button. If there is at least one visible (non-hidden) query statement, the query dialog will appear. Otherwise, the configured query will execute and results will be shown.
2.) If the query dialog is shown, specify the desired values to query against. Then click OK to run the query.
3.) When the query is complete, results will be shown. If the results are geographic, they will be shown on the map and in the attribute table. If they are tabular (i.e. non-geographic), they will only be shown in the attribute table.
===============================================
Setting up the Query Tool for development
===============================================
The source code for the Query Tool has been provided so that developers may customize the tool's behavior and use it as a reference for developing other add-ins. To setup the tool for development:
1.) Open the QueryTool.sln file contained in the Source Code folder that was packaged with the add-in. This solution contains two projects - a Silverlight project containing code for the Query Tool and a Viewer website project for debugging the add-in.
2.) To debug the add-in, press the F5 key or the play button in Visual Studio. This will load a Silverlight Viewer website with the Search Tool included on the main toolbar.
04-19-2013
12:29 AM
- Mark as New
- Bookmark
- Subscribe
- Mute
- Subscribe to RSS Feed
- Permalink
- Report Inappropriate Content
Jamal, there is a small user guide that is included in the .zip file you download. From this file:
Deploy, enable, use, and debug the Query Tool add-in as describled in the sections below.
===================
Tool deployment
===================
1.) Open the ArcGIS Viewer for Silverlight's Application Builder
2.) In the Application Builder, click Settings
3.) On the Settings page, click the Add-Ins tab.
4.) On the Add-Ins tab, click the Upload Add-In button.
5.) In the Open File dialog, browse to the QueryTool.AddIns.xap file (included with the sample) and double-click it.
Once these steps are complete, the Query Tool will be available in the Application Builder for users to add to their Viewer Applications.
=====================================================
Enabling the Query Tool in a Viewer application
=====================================================
1.) From the Application Builder home page, start creating a new Viewer application by clicking the Create New Application button.
2.) Choose the map you wish to start with in your Viewer application.
3.) On the Tools tab of the Application Builder's toolbar, click the Add Tool button.
4.) In the Add Tool dialog, select the Query Layer tool from the Query category and click Next.
5.) Define the tool's toolbar, label, toolbar, and icon as desired. Then click Next.
6.) Specify the URL to the layer to query and click connect. The URL must be to a layer or table within a map or feature service, such as http://serverapps10.esri.com/ArcGIS/rest/services/California/MapServer/1. Once the connection completes, click Next.
7.) Choose the field and operator to use for the query statement. Optionally, you may specify a default value or a list of values to choose from. Then click Next.
8.) To add another query statement, click the Add New link. Otherwise, click the Next button.
9.) Specify the desired options for the behavior of the query tool and click Next.
10.) Specify the tool's dialog title and labels. Optionally, query statements can be hidden by unchecking the associated checkbox. Click OK to complete tool configuration.
==========================
Using the Query Tool
==========================
1.) Click the Query Layer button. If there is at least one visible (non-hidden) query statement, the query dialog will appear. Otherwise, the configured query will execute and results will be shown.
2.) If the query dialog is shown, specify the desired values to query against. Then click OK to run the query.
3.) When the query is complete, results will be shown. If the results are geographic, they will be shown on the map and in the attribute table. If they are tabular (i.e. non-geographic), they will only be shown in the attribute table.
===============================================
Setting up the Query Tool for development
===============================================
The source code for the Query Tool has been provided so that developers may customize the tool's behavior and use it as a reference for developing other add-ins. To setup the tool for development:
1.) Open the QueryTool.sln file contained in the Source Code folder that was packaged with the add-in. This solution contains two projects - a Silverlight project containing code for the Query Tool and a Viewer website project for debugging the add-in.
2.) To debug the add-in, press the F5 key or the play button in Visual Studio. This will load a Silverlight Viewer website with the Search Tool included on the main toolbar.
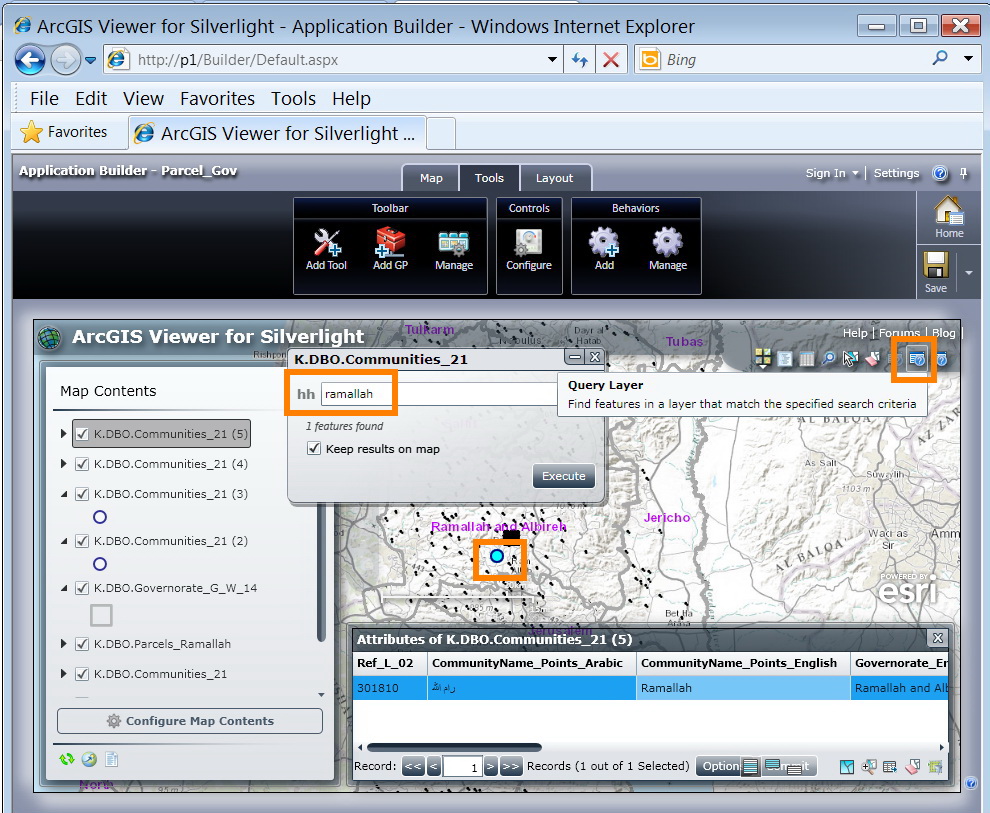
Many thanks Alexey for the help,
The tool is added but it doesn�??t appear under the query category. Please, have a look in the screenshots below
[ATTACH=CONFIG]23638[/ATTACH], [ATTACH=CONFIG]23639[/ATTACH]
What might be the issue?
Best
Jamal
----------------------------------------
Jamal Numan
Geomolg Geoportal for Spatial Information
Ramallah, West Bank, Palestine
Jamal Numan
Geomolg Geoportal for Spatial Information
Ramallah, West Bank, Palestine
by
Anonymous User
Not applicable
04-19-2013
01:24 AM
- Mark as New
- Bookmark
- Subscribe
- Mute
- Subscribe to RSS Feed
- Permalink
- Report Inappropriate Content
Original User: tereshenkov
I am not sure what the problem is, but try the following:
1. Delete the uploaded add-in from the Builder > Settings.
2. Upload it again and make sure the .xap file is accessible to the machine from which you use Builder.
3. Restart the IE and open the Builder again. The QueryAddIn should show the description (Settings menu).
4. Clear the IE cache if it still doesn't show up.
5. Install SL Viewer 3.1 (I am pretty sure the add-in is supposed to work with 3.0 too, but I am personally running 3.1) and run the upload again.
04-19-2013
01:54 PM
- Mark as New
- Bookmark
- Subscribe
- Mute
- Subscribe to RSS Feed
- Permalink
- Report Inappropriate Content
I am not sure what the problem is, but try the following:
1. Delete the uploaded add-in from the Builder > Settings.
2. Upload it again and make sure the .xap file is accessible to the machine from which you use Builder.
3. Restart the IE and open the Builder again. The QueryAddIn should show the description (Settings menu).
4. Clear the IE cache if it still doesn't show up.
5. Install SL Viewer 3.1 (I am pretty sure the add-in is supposed to work with 3.0 too, but I am personally running 3.1) and run the upload again.
Many thanks Alexey for the massive efforts,
Correct, it was an issue of internet brewer! I used the IE instead of Chrome and it worked fine
By the way, the tool is very powerful. Really very useful
[ATTACH=CONFIG]23681[/ATTACH]
Appreciated
Best
Jamal
----------------------------------------
Jamal Numan
Geomolg Geoportal for Spatial Information
Ramallah, West Bank, Palestine
Jamal Numan
Geomolg Geoportal for Spatial Information
Ramallah, West Bank, Palestine