- Subscribe to RSS Feed
- Mark as New
- Mark as Read
- Bookmark
- Subscribe
- Printer Friendly Page
- Report Inappropriate Content

If you've never used Leaflet, it's a fantastic lightweight mapping library that has grown in popularity over the years, mainly due to the simplicity of the API. It has tons of plugins and controls that can be used with it, including the Esri-Leaflet plugin that let's you work with ArcGIS Server and ArcGIS Online services.
There is plenty of great stuff in the examples for Esri-Leaflet on how to get started with it, but sometimes I get asked how a developer might incorporate it into their development workflow. Examples are great for getting familiar with the project, but as an application grows, things could get a little complicated. I just wanted to show you how you might get started from scratch with a more robust solution.
Get the bits
For this demo, you're going to need node and npm. Let's not worry about the whole io.js thing. Once you have node and npm installed, create a directory on your machine for your project. It doesn't need to be on a local server, we'll take care of that with node. With that directory created, open a terminal in it and run the following command in your command line tool of choice: npm init
Accept the defaults for the prompts you are given. When that is done, you will have a package.json file in your directory. Now we need to install a couple of modules to help us during development, including Leaflet and Esri-Leaflet.
npm install watchify --save-dev
npm install http-server --save-dev
npm install leaflet --save
npm install esri-leaflet --save
Basic setup
With the modules we'll need installed, let's get some basic files set up.
Create an index.html file in your directory that will look like this, nothing fancy.
<!DOCTYPE html>
<html>
    <head>
        <title>Starting Esri Leaflet</title>
        <link rel="stylesheet" href="http://cdn.leafletjs.com/leaflet-0.7.3/leaflet.css" />
        <link rel="stylesheet" href="css/main.css" />
        <meta http-equiv="content-type" content="text/html; charset=utf-8" />
        <meta name="viewport" content="initial-scale=1.0 maximum-scale=1.0">
    </head>
    <body>
        <script src="bundle.js"></script>
    </body>
</html>
Next create a css directory and let's make a simple main.css file in there.
html, body, .map-div {
  width : 100%;
  height : 100%;
  margin : 0;
}
Next create a src directory in your project and inside the src directory create an index.js file and a popup.js file. We'll come back to this file in a second.
Automate it
Now open the package.json file and let's make some edits to the scripts section.
"scripts": {
  "start": "http-server",
  "watch": "watchify src/index.js src/popup.js -o bundle.js -dv",
  "start-dev": "npm start | npm run watch"
}
This scripts section will let you run commands using npm. This is really handy for setting up quick development environments. The start section will run a local development server on localhost:8080. The watch section will check for changes to the files specified and output them using browserify to a bundle.js file that will compile all the required JavaScript into a single file.
Note - If you are not on Windows, you should be able to change the line to watchify src/*js instead of listing each file, but on my Windows machine, I needed to list each file to watch.
At this point, your development environment is all set up to automate bundling your JavaScript and to run a local server.
Run the following command and let's move on: npm run start-dev
Write some code
Open the src/popup.js file and lets write some code.
var L = require('leaflet');
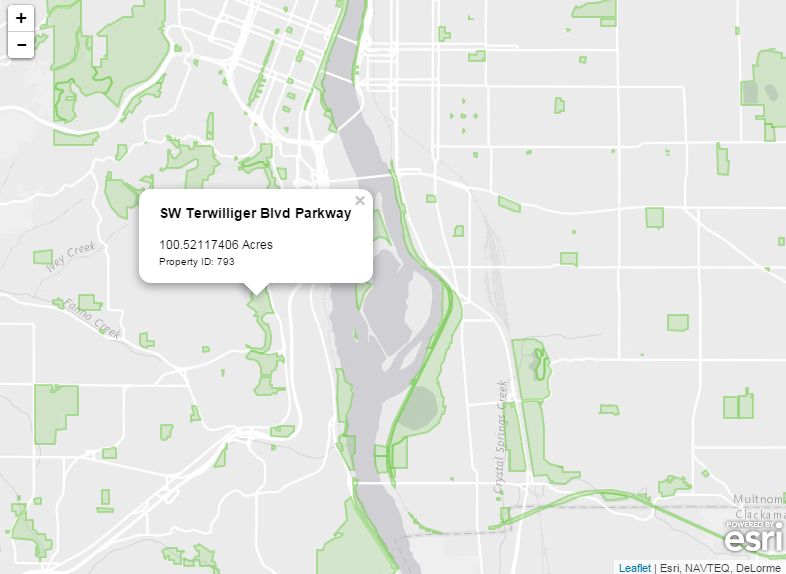
var popupTemplate = '<h3>{NAME}</h3>{ACRES} Acres<br><small>Property ID: {PROPERTYID}<small>';
module.exports = function(feature){
return L.Util.template(popupTemplate, feature.properties);
};If this looks odd to you, don't worry. This is commonjs syntax for writing modular JavaScript. Here is a great intro to commonjs modules on egghead.io. If you are used to using AMD with Dojo in the ArcGIS API for JavaScript this might throw you off a bit, but it works pretty nicely. In a module, whatever you define as the module.exports is what get's exported from this module. In this case, we are exporting a function that returns a popup template for Leaflet.
Now open up src/index.js and lets edit this file.
var L = require('leaflet'); // bring in Leaflet
require('esri-leaflet'); // add esri-leaflet
var popupTemplate = require('./popup.js'); // bring in our popup we just defined
var node = L.DomUtil.create('div', 'map-div', document.body); // create the node for the map
var map = L.map(node).setView([45.528, -122.680], 13);
L.esri.basemapLayer('Gray').addTo(map);
var parks = new L.esri.FeatureLayer('http://services.arcgis.com/rOo16HdIMeOBI4Mb/arcgis/rest/services/Portland_Parks/FeatureServer/0', {
  style: function () {
    return { color: '#70ca49', weight: 2 };
  }
}).addTo(map);
parks.bindPopup(popupTemplate);
All of this is standard code you would see in the Esri-Leaflet examples. The only difference is we are using require to add modules to the application. We even added the popup.js file we created earlier. Notice, require behaves differently here from how it does in Dojo.
What just happened?
You may not have noticed, but while you were editing your JavaScript files, you should have seen some messages in your terminal about a bundle.js file being created. That's because the npm scripts we wrote earlier are set up to watch for any changes in these JavaScript files and to recompile the them into single bundle.js file your application needs. If you open your browser to localhost:8080 *crosses fingers* you should seem something like this.
Congratulations! You just set up a very simple development environment to build your Esri-Leaflet applications. As you add more modules or organize your code, just edit the watch script in package.json as needed and keep on coding.
Here is the full application on github.
This is a very simplistic set up, but honestly you could do a lot with the npm scripts as they are currently designed. If you wanted to dive in with more robust tools, you could look at things like gulp, grunt or webpack. Get knee deep and learn to love your build tools.
For more geodev tips and tricks check out my blog.
You must be a registered user to add a comment. If you've already registered, sign in. Otherwise, register and sign in.