- Home
- :
- All Communities
- :
- Products
- :
- ArcGIS Pro
- :
- ArcGIS Pro Questions
- :
- Re: How do I assign polygon colors based on the va...
- Subscribe to RSS Feed
- Mark Topic as New
- Mark Topic as Read
- Float this Topic for Current User
- Bookmark
- Subscribe
- Mute
- Printer Friendly Page
How do I assign polygon colors based on the values in an attribute table?
- Mark as New
- Bookmark
- Subscribe
- Mute
- Subscribe to RSS Feed
- Permalink
- Report Inappropriate Content
I have a polygon feature class that represents the elevation change of the surface of a glacier. The feature class has a numeric field that contains elevation change values (example: 1.23, -4.56, etc.) So for example, a value of 1.23 indicates that the surface elevation increased by 1.23 meters, and a value of -4.56 indicates that the surface elevation decreased by 4.56 meters.
I want to assign a color to each polygon based on the polygon's elevation change value, such that positive changes would be shown in shades of green, and negative changes would be shown in shades of red.
I can do this using a colorramp that grades from green to red. However, it's not possible to assign the colors of a colorramp to a specific range of elevation change values, which is what I need to do. What I'd like to do is to use a lookup table to assign specific colors to specific ranges of elevation changes. Here's an example that might make this easier to understand:
From To Color
2.00 2.99 Dark green
1.00 1.99 Medium green
0.00 0.99 Light green
-0.01 -0.99 Light red
-1.00 -1.99 Medium red
-2.00 -2.99 Dark red
So, if a polygon in my feature class has an elevation change value of 1.48, it would be filled with a medium green color (because it falls within the range of 1.00 to 1.99). A value of -2.38 would be dark red, and so on.
I can't find a way to accomplish what I want to do in either ArcMap 10.5.1 or in ArcGIS Pro 2.0. Initially, I thought I'd be able to do it in Pro, as it provides a means to symbolize polygon color based on a specific attribute value. But that won't work for me; I need to assign polygon colors based on ranges of values (example: 1.00 to 1.99; -1.00 to -1.99; etc.).
Another option in Pro is to write a script to assign the polygon colors, but unfortunately, Pro 2.0 does not yet support using the Arcade scripting language to control symbolization.
So, any ideas on how I can accomplish what I want to do?
- Mark as New
- Bookmark
- Subscribe
- Mute
- Subscribe to RSS Feed
- Permalink
- Report Inappropriate Content
Not sure I follow, since you can do a 'manual' classification of the ranges, then you can also change the individual colour patches.
- Mark as New
- Bookmark
- Subscribe
- Mute
- Subscribe to RSS Feed
- Permalink
- Report Inappropriate Content
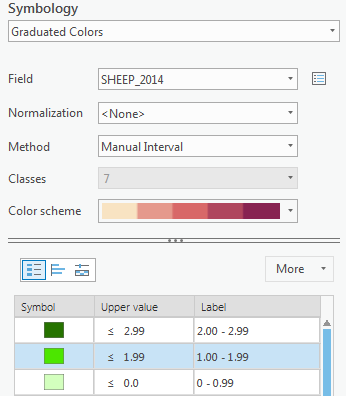
To elaborate on Dan's comment: on the Symbology pane, choose Graduated Colors. Pick the number of classes you want. Change the Method from Natural Breaks to Manual Interval. Edit your upper values and labels to look the way you want. Then individually click the symbols in each row to pick the colors. As in this image.
- Mark as New
- Bookmark
- Subscribe
- Mute
- Subscribe to RSS Feed
- Permalink
- Report Inappropriate Content
Yes, I was aware that I could manually change the ranges and set the colors using graduated colors symbology. But even that won't do what I want to do. I'll try to explain what I want to accomplish.
Every year, I measure how much the surface elevations of glaciers either increases or decreases (are they getting thicker or thinner, and where?). Each year, the elevation changes are different. For example, let's say that in 2010 the range of change was from +2 to -5. Then in 2011, the change was +0.7 to -3.5. And in 2012 it was +4 to -10. I need to be able to represent each year using the only one set of graduated colors and ranges. So I need to set my colors and ranges such that they encompass a range greater than the range of elevation change that I see in any one year. In other words, I need a master graduated color scale that does not change, and that I can apply to elevation changes from year to year. Then, once I have a master graduated color scale and defined ranges, I need to be able to save it in some way so that I can re-use it. It's critical that once I define the ranges and colors, that they don't change, even when the master color scale is used to symbolize a feature class in which the minimum and maximum elevation change values are less than the range of the master color scale. Does that make any sense? I know what I want to accomplish, but trying to explain it is difficult.
- Mark as New
- Bookmark
- Subscribe
- Mute
- Subscribe to RSS Feed
- Permalink
- Report Inappropriate Content
save to layer ... which retains symbology
apply symbology from layer .... should be used to apply a constant symbology between layers
- Mark as New
- Bookmark
- Subscribe
- Mute
- Subscribe to RSS Feed
- Permalink
- Report Inappropriate Content
Dan, thanks for the tips.
I used the Manual Interval method and defined my desired Upper Value ranges, then saved as a layer file. No problem with that. Here's what my graduated colors and ranges looked like:

I then saved my ArcGIS Pro project and closed it, as I had other stuff to do. Later, when I re-opened my Pro project again to continue working on it, my carefully defined Upper Values had somehow changed, as shown below. I didn't do anything other than just re-open the project. I expected that everything would be exactly as shown in the first screenshot above. I have no idea why some of my Upper Values were changed and why others were not. Strange. But it seems to me this should not happen.

Then, as a test, I copied my Height Change (2000 to 2016) layer and pasted the copy into the Contents pane, and switched the Field from 00 to 16 to 00 to 15, and then applied (imported) the symbology from my saved layer file. The result was the same as the screenshot directly above - with the incorrect Upper Value values.
So I don't know what's going on. It seems that, in theory, this should all work. But I can't get it to keep the Upper Values that I manually enter.
- Mark as New
- Bookmark
- Subscribe
- Mute
- Subscribe to RSS Feed
- Permalink
- Report Inappropriate Content
Hi Scott,
Would it be possible for you to share with me the data you're symbolizing? I will ping you off of this thread and we can see if we can reproduce the issue. From what we can tell on our side, if using the Manual classification method to symbolize the layer, then save the lyrx file and use the Apply Symbology From Layer tool... all that should work without changing values or labels.
I'll ping you offline to see if we can make headway on this.
- Mark as New
- Bookmark
- Subscribe
- Mute
- Subscribe to RSS Feed
- Permalink
- Report Inappropriate Content
Well, it seems that I have it working properly now.
I originally started this project in ArcMap. I started doing the graduated symbols symbology in ArcMap, and then decided I’d switch over to ArcGIS Pro. So I saved an MXD, then started a new Pro project and imported the MXD into it.
It was in Pro where I started having the problem with my graduated symbology (using the Manual method) not being retained after saving the Pro project and re-opening it. So, as a test, I opened the Pro project, removed the feature class that I was symbolizing, saved the Pro project and closed it.
I then opened the Pro project again and added the feature class back into it. I then re-did the graduated symbology (using the Manual method), set my desired Intervals and symbol colors, saved the project, and closed it.
Upon re-opening the project, all of my graduated symbology, intervals, and colors were exactly as I had saved them – everything was fine, no problems. So maybe the original problem I had might have had something to do with importing the MXD into the Pro project, but that’s just a wild guess on my part.
Also, I was able to successfully save to a layer file and then apply the symbology from the saved layer file to a new feature class in my Pro project. That worked just fine – no problems.
At any rate, all’s well now.
- Mark as New
- Bookmark
- Subscribe
- Mute
- Subscribe to RSS Feed
- Permalink
- Report Inappropriate Content
Thanks for letting us know, Scott. I just tried the import MXD workflow, and things still look to be working as expected for me (MXD created in ArcMap 10.5.1, imported to Pro 2.0.1).
Glad you have it working now.
Cheers
- Mark as New
- Bookmark
- Subscribe
- Mute
- Subscribe to RSS Feed
- Permalink
- Report Inappropriate Content
Now it is clearer... a link to the help files for symbology related options is in order