- Subscribe to RSS Feed
- Mark as New
- Mark as Read
- Bookmark
- Subscribe
- Printer Friendly Page
- Report Inappropriate Content
This is the first installment in a three-part series on creating geoprocessing models in ArcGIS. In this post, learn the steps to build a simple model.

ModelBuilder has been called a visual programming language or a tool to make "visual scripts." I like to think of ModelBuilder as a tool to map a workflow, and a model as a workflow map. Like a map:
- A model can be navigated (it has direction built in).
- A model uses shape, color, text, and symbols to represent and communicate about its features.
- A model reveals data relationships that can spark ideas and collaboration.
Invaluable for conducting sophisticated spatial analyses, models are everyday workhorses too. If built with reuse in mind, they can be your go-to shortcuts to get a lot of work done.
If you've never created a model in ArcGIS, here's what you need to know to get started.
Take the five-step approach:
- Plan the workflow
- Create the model shell
- Add tools and specify parameters
- Validate the model
- Run the model
1. Plan the Workflow
Obvious, but...before creating a model, know what you want it to do. List the data input, identify the required geoprocessing tools, and describe the desired output. If the workflow is simple, just think it through in your head.
For more complicated workflows, you may want to sketch everything out on paper or a whiteboard. If you're not sure which tool to use or what a tool's required inputs are, check the geoprocessing tool reference.
2. Create the Model Shell
In ArcGIS, a model has to be stored inside a toolbox. Creating a toolbox is simple.
- Right-click a folder in the ArcMap Catalog window and choose New > Toolbox.
- Right-click the new toolbox and choose New > Model. An empty model window opens.
Now set some key model properties.
- Click the Model menu > Properties.
In the General tab, check on the option to store relative path names. Using relative paths prevents headaches down the road if data gets moved around.
Also, set these: 
- Model name — the filename; no spaces allowed.
- Label — the plain-English name; displays in the ModelBuilder titlebar and in the Catalog window. Spaces are fine.
- Description — briefly explain what the model does. This will be a helpful reminder to you later and essential information if you share the model.
3. Add Tools and Specify Parameters
With the basic setup done, now comes the fun part. You can't beat ModelBuilder for easy drag-and-drop building and tinkering. But hang on a sec, it's useful to understand some ModelBuilder vocabulary.
- A model consists of one or more processes. A process consists of three elements: input data, a tool, and the tool's output. Each output becomes input to the next process.
- Just like when you run a geoprocessing tool outside a model, if your input data has selected features or records, the tool processes only the selection.
- The output of each model process (except the last) is called intermediate data. When you run a model inside ModelBuilder, intermediate data is automatically saved. If you don't need it, you can delete it by clicking the Model menu > Delete Intermediate Data.

When you add a tool to a model (by dragging/dropping from the Catalog window or using the Insert menu), its output element is also added and both elements are white. In model parlance, white means "not ready to run." You need to double-click the tool and set its parameters.
- Tip: In a tool dialog box, a green dot means the parameter is required.
 As you add processes, the model window may fill up. Use the Full Extent button, followed by the Auto Layout button to see the big-picture view and zoom in and out as needed.Be sure to save the model periodically as you build it.To add the final model output as a layer to the map, right-click it and choose Add To Display. Otherwise, you'll have to manually add it to the map.
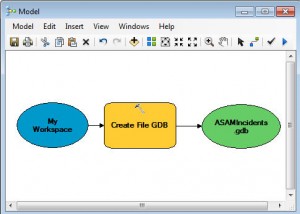
- Within ModelBuilder (click the Run button or Model menu > Run)
- Outside of ModelBuilder as a tool or service
 It's fun to run a model inside ModelBuilder. As the model progresses, each process turns red and then gets a drop shadow. The drop shadow indicates the process has completed correctly. If a process turns white, that means something needs to be fixed and the model stops running. If you've validated, this shouldn't happen.
- Note: If you delete intermediate data before changing a parameter, you'll need to rerun the model from the beginning.
Related posts:
You must be a registered user to add a comment. If you've already registered, sign in. Otherwise, register and sign in.
ModelBuilder 101 for ArcGIS Pro Users
-
ArcGIS Desktop
25 -
ArcGIS Step by Step
40 -
Class Resources
14 -
e-Learning
46 -
MOOCs
20 -
Software Demos
9 -
Technical Certification
12