- Home
- :
- All Communities
- :
- Industries
- :
- Land Records and Valuation
- :
- Land Records and Valuation Questions
- :
- ArcGIS Parcel Fabric: Reset Adjustments/Transforma...
- Subscribe to RSS Feed
- Mark Topic as New
- Mark Topic as Read
- Float this Topic for Current User
- Bookmark
- Subscribe
- Mute
- Printer Friendly Page
ArcGIS Parcel Fabric: Reset Adjustments/Transformations?
- Mark as New
- Bookmark
- Subscribe
- Mute
- Subscribe to RSS Feed
- Permalink
- Report Inappropriate Content
So I'm learning how to use parcel fabrics, and getting frustrated so far. I attempted to do an adjustment on one of my subdivision plans (600 parcels). I thought it worked, so I saved it. Then on closer inspection, I realized that ArcGIS had totally mangled my parcels. However, since I saved it, UNDO is no longer an option. Is there a way to reset the geometry for a parcel/plan/fabric back to the internal (COGO) geometry so I can start again?
It appears that the only help I can find from Esri on this is to delete the parcels and enter them again, but this seems like an idiotic "solution" (especially for 600 parcels). I have tried unjoining and rejoining them, but this keeps the warped geometries. I may be remembering things wrong, but it seems like the old survey analyst handled things like this much better.
Solved! Go to Solution.
Accepted Solutions
- Mark as New
- Bookmark
- Subscribe
- Mute
- Subscribe to RSS Feed
- Permalink
- Report Inappropriate Content
So after playing with Tim's solution for a few minutes, it made me think of a different approach that ended up working perfectly for me (and quickly for a 600-parcel subdivision): use the parcel adjustment "against" itself! Here's what I did.
1. Create one or more "theoretical" control points for the plan based on the measurements and the POB. That is, these are control points that have nothing to do with the real world, but have a location calculated purely from the COGO measurements. For me, that was easy because it was a perfect N-S-E-W grids with all the blocks and streets the same size. For a more complex subdivision, you would have to create a fake parcel traverse to get out to the control points. I had really good results with the POB+one other control point, perfect results with the POB+4.
2. Activate these controls and deactivate all the "real" control points.
3. Select all the parcels in the plan and run the adjustment. BTW, one thing that is not documented well is because the adjustment is incremental, you don't get the best match the first time. You have to do a few cycles of "Run" then "Accept," until the Maximum Shift (in the upper right corner of the Adjustment Report) gets very low. In my case, about 6-7 cycles brought it down to 0 shift with 0 RMSE.
The result may not be exactly what was originally entered in the COGO measurements, but it is closer than you can measure. The advantage of this approach is that I can do normal parcel adjustments with the regular control points, and if it ever gets messed up, I can always bring it back and start over.
- Mark as New
- Bookmark
- Subscribe
- Mute
- Subscribe to RSS Feed
- Permalink
- Report Inappropriate Content
Sorry Brandon, but if you have saved it...
If you are working in a SDE db, with versioning, you should be okay, the original data will still be there.
If not, start looking for a backup copy.
- Mark as New
- Bookmark
- Subscribe
- Mute
- Subscribe to RSS Feed
- Permalink
- Report Inappropriate Content
If the problem was as simple as I had goofed up, then versioning would be a satisfactory (if not for me with a file geodatabase) answer. However, it seems like a design flaw. Besides this example, I have in the past two weeks already hit a number of situations where I would like to regenerate the geometry based on the COGO descriptions. For example:
- Adjusting a global rotation factor based on the coordinate system grid north
- Adjusting the POB based on a better coordinate measurement for a monument
- Fixing a mistyped measurement back in an early parcel (i.e., the location of all subsequent parcels is based on it)
- Adjusting COGO measurements for a parcel that doesn't close well (yes, in this case I have the freedom to do that).
In Survey Analyst (2004), I could make these kinds of changes, and they would propagate throughout the network. Is this capability somehow mutually exclusive with the ability to do the least squares adjustment with control points?
- Mark as New
- Bookmark
- Subscribe
- Mute
- Subscribe to RSS Feed
- Permalink
- Report Inappropriate Content
Brandon, I'm sorry to hear that you’re experiencing problems. Since you were able to successfully complete the fabric adjustment, it implies that the cogo record data is good; the adjustment report will also help you to find any problem distances or bearings, close points, and so on.
With regard to your case of the problem geometry, we have seen cases where a bug in the software created some incorrect line-point locations in certain workflows; this bug was fixed in the 10.3 release. Without seeing your data it’s hard to know if these “bad” line-points are the cause for the problems you’re seeing. (I’ll message you separately to see if I can arrange to get your data and to help you. Please also contact tech support directly.)
Otherwise, here are some things you could try:
- Ensure that you have the latest parcel fabric patch for your particular release, you can find the list of patches here.
- In the Catalog window, right-click the Fabric and click “Check Parcel Fabric” to get a report on the data in the fabric. If there are any errors reported this may provide some clues as to the cause.
- There is an Add-in that will help detect and delete “bad” records such as bad line points. You can get that from here, and it includes documentation on how to use and what it does.
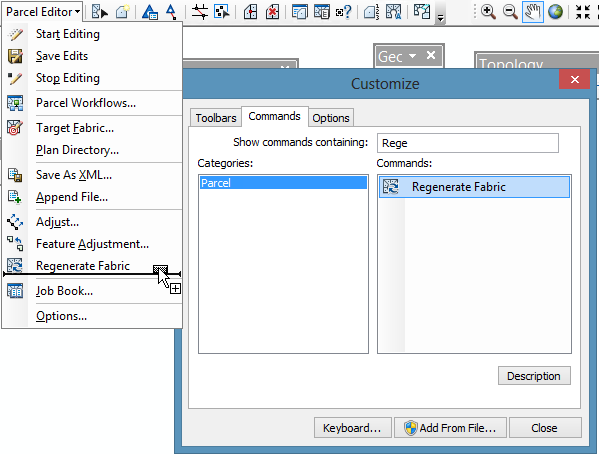
- Select the 600 parcels and run the Regenerate command. (If you are using a pre-10.3 release you’ll need to add this command via Customize-> Customize Mode, click on the Commands tab, type “Regen” in the search text box, then drag the command from the list onto the Parcel Editor toolbar.)
-Tim
- Mark as New
- Bookmark
- Subscribe
- Mute
- Subscribe to RSS Feed
- Permalink
- Report Inappropriate Content
These are all useful tips that might make the adjustment marginally better (they didn't help my parcels, but then I had already done most of them). However, they don't really answer my original question: how can I eliminate the adjustments altogether and retrieve the geometry purely based on the COGO measurements? I listed several uses for such a capability above, but for this particular situation, I'd like to be able to try a completely different approach to my adjustment: do a global rotation first to account for the coordinate system grid north, then do the least squares adjustment.
I must really be misunderstanding the whole parcel fabric idea (this is for a research project, not a municipal GIS where Parcel Fabrics would more commonly be used), because I keep hitting these issues that nobody else seems to have any difficulty with. For example, why is there nothing in the documentation about how to correctly handle the declination between the grid north of the local coordinate system and true north?
- Mark as New
- Bookmark
- Subscribe
- Mute
- Subscribe to RSS Feed
- Permalink
- Report Inappropriate Content
Brandon, for your last example, each parcel has it's own rotation that is computed for you during the adjustment. This rotation value is then assigned and stored on each parcel. There is this technical paper, recently updated, that goes into the details of fabric adjustment, it may help with your research project.
There are also a few recorded sessions from the Land Records meetup that demonstrate use of fabric adjustment.
For your original questions, to see one parcel in it's unadjusted shape, you can use the Parcel Measurement view.
To reposition a single parcel or multiple parcels within the network, and place them back to their original position you can unjoin, remove existing links, and then rejoin. (See parcel joining)
To adjust the POB based on a better coordinate for a monument, place a control point at the better position (or edit the coordinates of the existing control point) and then join the parcel to it or associate the fabric point to it (see control points)
To fix a mistyped measurement back in an early parcel, open the parcel and edit the measurement.
To adjust COGO measurements for a parcel that doesn't close well see the section on parcel traverse closure here.
-Tim
- Mark as New
- Bookmark
- Subscribe
- Mute
- Subscribe to RSS Feed
- Permalink
- Report Inappropriate Content
Tim, thank you for working through my various scenarios. I hope the several answers to several questions doesn't lose the focus, but I'll try to respond to everything.
- Adjustment (the white paper etc.): I'm not arguing the validity or rigor of the adjustment process; I'm sure it does what it's supposed to with the data you give it. It does take some practice (and some trial and error) to learn to give it the right data (e.g., the effect of the accuracy attribute, or the best locations for control points), and the inability to "start over" is a problem here.
- Rejoining: I have tried this. I was originally very hopeful that this would do exactly what I wanted (reset the geometries back to the COGO measurements), because when you unjoin the parcels, and edit them, they appear to be in their original geometry. But alas, when I join or rejoin them (with fewer links, like 1), they retain the adjusted (warped) shapes; in fact, some parcels get far worse during the rejoin process. Maybe I'm doing it wrong
- POB: yes, that does work when I unjoin and rejoin to it (especially if it is the only link), or if it is part of an existing adjustment set. I won't worry about this one further.
- Altering measurements: it does appear that if I unjoin the parcels, and edit a parcel, it changes shape and the surrounding parcels are affected by it. If it is still joined, I can change the measurements but the shape doesn't change. I won't worry about this one either for now.
Again, thanks for attempting to find a workaround, but it looks like I can't do what I want to do. Seeing the original geometry when I open the parcels when they are unjoined is tantalizingly close; if only there were a button I could push to say "keep that!"
- Mark as New
- Bookmark
- Subscribe
- Mute
- Subscribe to RSS Feed
- Permalink
- Report Inappropriate Content
Brandon, thanks for sending your data. I sent you the steps in a pdf for how to do what I think you're asking for, by using the approach of unjoin, removing links, positioning parcel geometry, and then joining it back in.
I'm not sure if this, or some variation of this approach will be satisfactory for your project, but I'm attaching these steps here anyway for any others reading this topic who may find it useful: Resetting Parcel Location by Unjoin and Join.pdf - Box
-Tim
- Mark as New
- Bookmark
- Subscribe
- Mute
- Subscribe to RSS Feed
- Permalink
- Report Inappropriate Content
Tim, thanks for working so hard on this. Your solution isn't perfect; I'm not really resetting the geometry so it matches the original, just visually transforming (rotate & scale) the geometry so it looks right, but it's probably the best I'm going to get, so I'll mark it as answered.
- Mark as New
- Bookmark
- Subscribe
- Mute
- Subscribe to RSS Feed
- Permalink
- Report Inappropriate Content
So after playing with Tim's solution for a few minutes, it made me think of a different approach that ended up working perfectly for me (and quickly for a 600-parcel subdivision): use the parcel adjustment "against" itself! Here's what I did.
1. Create one or more "theoretical" control points for the plan based on the measurements and the POB. That is, these are control points that have nothing to do with the real world, but have a location calculated purely from the COGO measurements. For me, that was easy because it was a perfect N-S-E-W grids with all the blocks and streets the same size. For a more complex subdivision, you would have to create a fake parcel traverse to get out to the control points. I had really good results with the POB+one other control point, perfect results with the POB+4.
2. Activate these controls and deactivate all the "real" control points.
3. Select all the parcels in the plan and run the adjustment. BTW, one thing that is not documented well is because the adjustment is incremental, you don't get the best match the first time. You have to do a few cycles of "Run" then "Accept," until the Maximum Shift (in the upper right corner of the Adjustment Report) gets very low. In my case, about 6-7 cycles brought it down to 0 shift with 0 RMSE.
The result may not be exactly what was originally entered in the COGO measurements, but it is closer than you can measure. The advantage of this approach is that I can do normal parcel adjustments with the regular control points, and if it ever gets messed up, I can always bring it back and start over.