- Home
- :
- All Communities
- :
- Products
- :
- ArcGIS StoryMaps
- :
- Classic Esri Story Maps Questions
- :
- Creating additional icons - e.g. for Playlist temp...
- Subscribe to RSS Feed
- Mark Topic as New
- Mark Topic as Read
- Float this Topic for Current User
- Bookmark
- Subscribe
- Mute
- Printer Friendly Page
Creating additional icons - e.g. for Playlist template
- Mark as New
- Bookmark
- Subscribe
- Mute
- Subscribe to RSS Feed
- Permalink
- Report Inappropriate Content
Solved! Go to Solution.
Accepted Solutions
- Mark as New
- Bookmark
- Subscribe
- Mute
- Subscribe to RSS Feed
- Permalink
- Report Inappropriate Content
Hi Julie, did you make sure to download the developer download and follow all these instruction: GitHub - Esri/playlist-storytelling-template-js: A storytelling template that organizes point data s...? The error you're getting appears that you never ran "bundle install" or that you have not installed ruby or the bundle installer appropriately. If you're on windows, you should also make sure you are using a command line program that provides access to the ruby commands. You should be able to run "ruby -v" and "bundle -v" to see the version numbers of each program installed.
- Mark as New
- Bookmark
- Subscribe
- Mute
- Subscribe to RSS Feed
- Permalink
- Report Inappropriate Content
I've attached the Photoshop files to make it a little easier. For each icon, you will need to open the appropriate Photoshop file, change the text layer with the new number (you will probably need to adjust the font size to make sure it fits within the pin), then "save as" the icon as a jpg.
You will need to save the new jpeg with the exact same file name (changing only the number portion) and in the correct color folder. Once you have added the new icons, you will need a JavaScript developer to modify the source code to allow for more than 99 points.
- Mark as New
- Bookmark
- Subscribe
- Mute
- Subscribe to RSS Feed
- Permalink
- Report Inappropriate Content
Hi Stephen,
Would you mind to pinpoint exactly where to modify the Playlist codes in order to allow for more than 99 points please? I've put all the extended numbered marker symbols that Rupert created in the same folder as the rest of 1-99 numbered icons by color. But still can't find where to modify the codes to include them.
Thank you very much in advance!
Emily
- Mark as New
- Bookmark
- Subscribe
- Mute
- Subscribe to RSS Feed
- Permalink
- Report Inappropriate Content
Emily,
The first thing you'll need to do is make sure you are using the developer download of the Playlist app. Instructions for setting up your computer for testing your app, building it for production, and source code are available here: Esri/playlist-storytelling-template-js · GitHub.
After you have added the additional photo icons to the correct folder, open up the MapConfig.js file (source > app > javascript > playlist > config > MapConfig.js). On line 19 you can increase the 'maxAllowablePoints' variable. Then make sure you build you app for production before deploying to your server.
- Mark as New
- Bookmark
- Subscribe
- Mute
- Subscribe to RSS Feed
- Permalink
- Report Inappropriate Content
Stehpen,
Thank you very much for your quick reply. I've downloaded the js developer version of the Playlist app, increased the 'maxAllowablePoints' variable from 99 to 700 on line 19 from the MapConfig.js file (source > app > javascript > playlist > config > MapConfig.js), and updated the webmap ID and other minor things from the index.html file (deploy > index.html). But I still cannot link them together and make the two files talk to each other? The webapp result still gives me up to 99 features. I'm sorry that I'm not a developer, and I've followed the instructions and downloaded all the needed files (Git, Ruby, Ruby Dev Kit, Node) many many times, but I'm still stuck and sort of confused from here on: 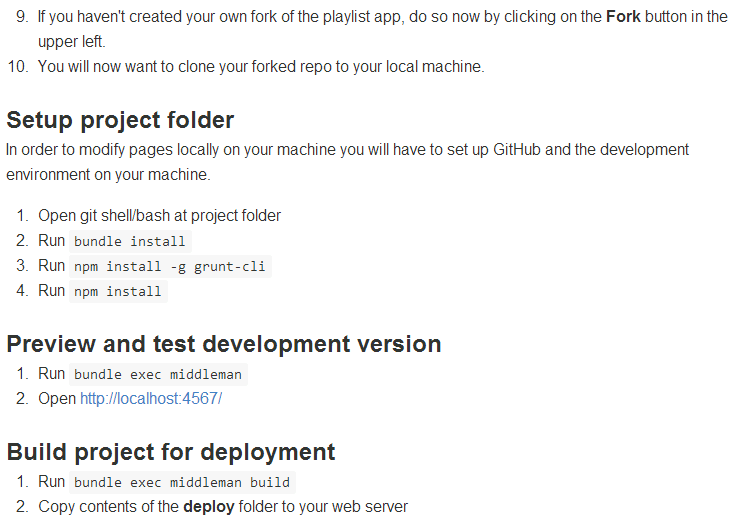
and it gave me this error message from the Git Shell commend prompt:
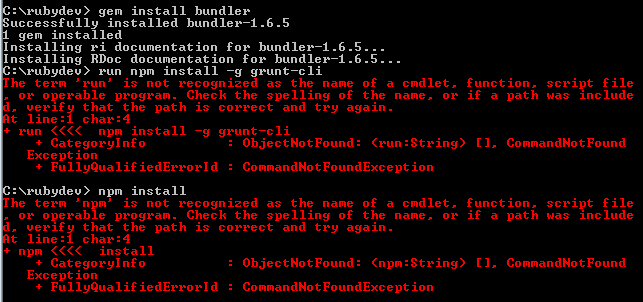
Thank you very much for your time here and any help is greatly appreciated!
Sincerely,
Emily
- Mark as New
- Bookmark
- Subscribe
- Mute
- Subscribe to RSS Feed
- Permalink
- Report Inappropriate Content
Looks like you are not in the github-shell? Depending on where you have installed github it should show somethihng like: C:\Users\...\GitHub>
You can start the Git-Shell directly from the start-menu or in Git via right-click on the repository where you saved the files of the dev-version.
- Mark as New
- Bookmark
- Subscribe
- Mute
- Subscribe to RSS Feed
- Permalink
- Report Inappropriate Content
Also, make sure you are running these commands from within the project directory that contains the playlist files. Here’s a trick to get there easily: http://lifehacker.com/5989434/quickly-open-a-command-prompt-from-the-windows-explorer-address-bar
- Mark as New
- Bookmark
- Subscribe
- Mute
- Subscribe to RSS Feed
- Permalink
- Report Inappropriate Content
Thank you both Flo and Stephen for your replies.
I think I'm still confused on where to run what. Am I supposed to setup project folder (run 'bundle install', 'npm install -g grunt-cli', 'npm install') in the GitHub location or where I cloned the project?
I tried both environments...but none of them seem to work when I got to 'bundle exec middleman' :


Another dumb question please... am I supposed to modify the codes and do my edits after running 'npm install' but before running 'bundle exec middleman'?
Thank you tremendously again!
Emily
- Mark as New
- Bookmark
- Subscribe
- Mute
- Subscribe to RSS Feed
- Permalink
- Report Inappropriate Content
Hi Emily,
here´s what I did:
- install the programes mentioned by Stephen
- create a folder in C:\Users\...\GitHub, e.g. called "playlist"
- download the files of the developer version and save them in "playlist"
- open Git > click on create repository and browse to the "playlist" folder > ok
- the new repository appears in Git > right-click it > open in git-shell
- follow the instructions given by Stephen (>
bundle install >npm install -g grunt-cli >npm install - test and build the app
- Mark as New
- Bookmark
- Subscribe
- Mute
- Subscribe to RSS Feed
- Permalink
- Report Inappropriate Content
Emily,
You will need to "set up you project folder" where you cloned the project (location in your first screenshot) but you will need to be using the Git Shell and not just the normal command line. If you type in "git" you should see a list of commands. This will indicate that you are using the correct command line tool.
From there, you will want to run the 4 commands that are in "setup project folder" section. This will install the dependent files and apps to test and build your app.
Then you can run 'bundle exec middleman' and open http://0.0.0.0:4567/ when that is running. The runs a local server on your computer that displays a test version of your app. When this is running, modify the source files and refresh your browser to see changes.
When you have all the changes in place, run 'bundle exec middleman build' to create a deployable version of your app.