- Home
- :
- All Communities
- :
- Products
- :
- ArcGIS CityEngine
- :
- ArcGIS CityEngine Questions
- :
- Coloring of shape edges using CGA
- Subscribe to RSS Feed
- Mark Topic as New
- Mark Topic as Read
- Float this Topic for Current User
- Bookmark
- Subscribe
- Mute
- Printer Friendly Page
- Mark as New
- Bookmark
- Subscribe
- Mute
- Subscribe to RSS Feed
- Permalink
- Report Inappropriate Content
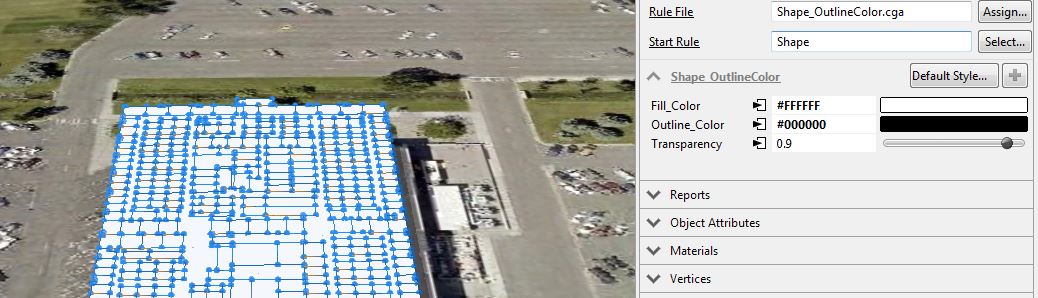
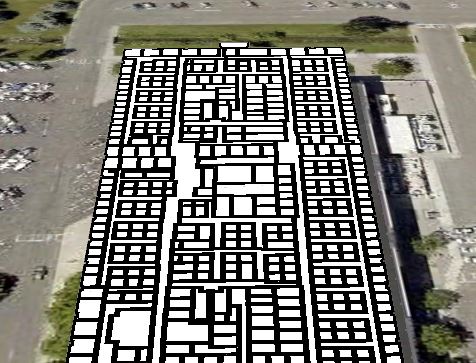
I am trying to color edges (border and interior) of a planar shape layer (see screenshot) in CE using CGA. Ultimately, it would be great if colors could be chosen for the background (faces?) color as well as the outlines (edges?). I have been looking into the comp(Operation) option to select out the edges and color them. If I use:
set(material.opacity, Transparency)
color (...)
...then I can change the color/transparency of the entire shape, but the individual shape outlines are not visible and do not have a distinct color when I export the models as .3ws. I would like to be able to designate colors for both the outline and shape in CE prior to the export. Any suggestions would be very helpful as I am new to CE/CGA.
I have attached my current CGA code as well as a snip of the layer I am working with.
Thanks!
version "2015.1"
attr Fill_Color = "#FFFFF"
attr Outline_Color = "#000000"
attr Transparency = 0.9
@StartRule
Shape -->
set(material.opacity, Transparency)
comp(e) {all: color(Outline_Color)
}
comp(f) {all: color(Fill_Color)
}
X.
Solved! Go to Solution.
Accepted Solutions
- Mark as New
- Bookmark
- Subscribe
- Mute
- Subscribe to RSS Feed
- Permalink
- Report Inappropriate Content
Okay, I just fixed on it for a minute. I simplified it to be more readable. Now you have a start rule, and that rule sends the border to a new rule, and the inside shape to a new rule. Just easier to read/debug that way. Face clashing effect should be gone now. I also reversed the set opacity part, so that increasing that attribute increases the transparency (since opacity is the opposite of transparency):
set(material.opacity, 1-Transparency)
CGA file is attached.
Chris
- Mark as New
- Bookmark
- Subscribe
- Mute
- Subscribe to RSS Feed
- Permalink
- Report Inappropriate Content
Try using the CGA operation called offset, together with comp. Send individual faces to a rule like this:
AddOutline -->
offset(-0.02) # thickness of your border. Negative value offsets inwards.
comp( f ) {border: color(myBorderColor) MyBorder. | inside: MyInside.}
Chris
- Mark as New
- Bookmark
- Subscribe
- Mute
- Subscribe to RSS Feed
- Permalink
- Report Inappropriate Content
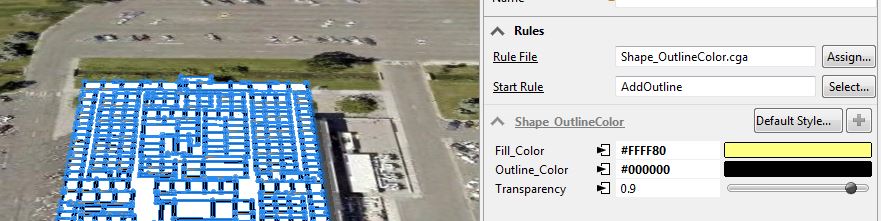
Thank you so much for your help! I was able to get the outlines using:
version "2015.1"
attr Fill_Color = "#FFF80"
attr Outline_Color = "#000000"
attr Transparency = 0.9
@StartRule
AddOutline -->
offset(-0.5) # thickness of your border. Negative value offsets inwards.
comp( f ) {border: color(Outline_Color) MyBorder. | inside: MyInside.}
Shape -->
set(material.opacity, Transparency)
color(Fill_Color)
X.
Any ideas on how to get the fill color to show up?
Thanks again,
Tess
- Mark as New
- Bookmark
- Subscribe
- Mute
- Subscribe to RSS Feed
- Permalink
- Report Inappropriate Content
This line has a couple of placeholders:
comp( f ) {border: color(Outline_Color) MyBorder. | inside: MyInside.}
Your rule called Shape is not getting called anywhere, so use the "inside" selector to run your rule "Shape" from there....
comp( f ) {border: color(Outline_Color) MyBorder. | inside: Shape}
- Mark as New
- Bookmark
- Subscribe
- Mute
- Subscribe to RSS Feed
- Permalink
- Report Inappropriate Content
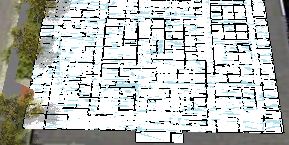
That seems to do the trick. Thanks a ton!
The fill color is just patchy.... It shows up the same way in the WebScene too.
- Mark as New
- Bookmark
- Subscribe
- Mute
- Subscribe to RSS Feed
- Permalink
- Report Inappropriate Content
Might be another copy of the floor faces. You want to post the rule? I'll check it over if so.
- Mark as New
- Bookmark
- Subscribe
- Mute
- Subscribe to RSS Feed
- Permalink
- Report Inappropriate Content
Absolutely. Thanks!
version "2015.1"
attr Fill_Color = "#FFF80"
attr Outline_Color = "#000000"
attr Transparency = 0.9
@StartRule
AddOutline -->
offset(-0.2) # thickness of your border. Negative value offsets inwards.
comp( f ) {border: color(Outline_Color) MyBorder. | inside: Shape.}
color(Fill_Color)
set(material.opacity, Transparency)
X.
- Mark as New
- Bookmark
- Subscribe
- Mute
- Subscribe to RSS Feed
- Permalink
- Report Inappropriate Content
Okay, I just fixed on it for a minute. I simplified it to be more readable. Now you have a start rule, and that rule sends the border to a new rule, and the inside shape to a new rule. Just easier to read/debug that way. Face clashing effect should be gone now. I also reversed the set opacity part, so that increasing that attribute increases the transparency (since opacity is the opposite of transparency):
set(material.opacity, 1-Transparency)
CGA file is attached.
Chris
- Mark as New
- Bookmark
- Subscribe
- Mute
- Subscribe to RSS Feed
- Permalink
- Report Inappropriate Content
Chris,
It looks a ton better now. Thank you so much for all of your help and time!
Tess