- Home
- :
- All Communities
- :
- Products
- :
- ArcGIS Collector
- :
- ArcGIS Collector Questions
- :
- Re: Is it possible to collect accurate Z coordinat...
- Subscribe to RSS Feed
- Mark Topic as New
- Mark Topic as Read
- Float this Topic for Current User
- Bookmark
- Subscribe
- Mute
- Printer Friendly Page
Is it possible to collect accurate Z coordinate values with Collector and Trimble R2?
- Mark as New
- Bookmark
- Subscribe
- Mute
- Subscribe to RSS Feed
- Permalink
- Report Inappropriate Content
We have been told that the ESRI software does not calculate the correction from HAE to MSL. We have also been told that people are, indeed, using this equipment configuration to do so. And it seems like it should be poosible.
- Mark as New
- Bookmark
- Subscribe
- Mute
- Subscribe to RSS Feed
- Permalink
- Report Inappropriate Content
Don,
Below are the instructions to convert the HAE to actual elevation transformation from the data obtained from high accuracy GPS using Collector. I have assumed the following:
- You have configured the database receiving the data to support the GPS metadata. In particular the ESRIGNSS_LATITUDE, ESRIGNSS_LONGITUDE and ESRIGNSS_ALTITUDE fields. If you have not, this can easily be added using the Add GPS Metadata Fields tool in ArcGIS Pro. I can also provide additional instructions, if needed.
- You stated your GPS is configured or is receiving data in the GCS NAD 1983 (2011) for horizontal data and I am assuming it is configured to receive vertical data in an ellipsoidal based, North American NAD 1983 (2011) datum coordinate system. It is critical that you have the correct coordinate systems for this data. ArcGIS collector stores this raw data in the Latitude, Longitude and Altitude fields noted above.
- Insure your coordinate systems have been updated. Go to my.ESRI.com and download and install the Current ArcGIS Coordinate System Data - I believe the current version is 10.7.10000. You can check your Windows Control Panel > Programs and Features to see if this is installed.
- If you have not already, go to the Github ESRI / Collector-tools site and download the tools for collector. I recommend you download the entire tool set using the Clone or download button, save and extract to a common location.

Now lets get to the actual transformation of the 2D data stored in ArcGIS Online (AGOL) to 3D data with the correct elevation data.
- Open ArcGIS Pro and load the original AGOL data into a map.
- Right-Click the feature and select Data > Export Features and point to a local GDB. You will be working with is local copy of the data.
- On the Insert Tab select Toolbox > Add Tool box
- Navigate to the folder you downloaded from GitHub and add CollectorUtilis_Pro.tbx. This should be located in the folder ...\collector-tools-master\CollectorUtils\pro
- Go to Catalog in ArcGIS Pro and select Toolboxes > CollectorUtilities_Pro.tbx > GeneralUtils > ProjectZ
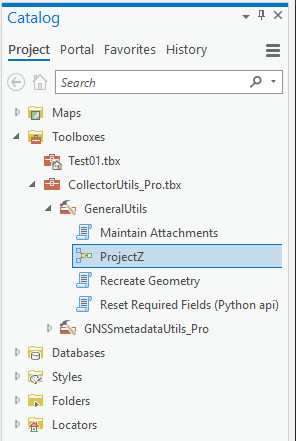
- In the ProjectZ tool, select the newly created feature Class in the local GDB for the Input Features. Mine is called SurveyPointFeatures_Copy for this example. A warning triangle will appear as the data does not have z data - ignore
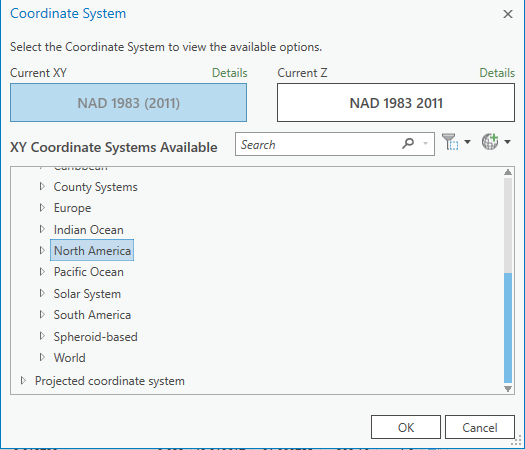
- For the Input Coordinate System - Click on the globe and select the following for Current XY and Z - based upon assumptions above
Click on the Current XY box then select:
Geographic coordinate system > North America > USA and territories > NAD 1983 (2011)
Click on the Current Z box and select:
Vertical Coordinate System > Ellipsoidal-based > North America > NAD 1983 2011
Click OK
- Confirm the X-Value is set to the Longitude field, the Y-Value is set to the Latitude field and the Z-Value is set to the Altitude filed. These should populate by default.
- Enter an output feature class - I used "SurveyPointFeatures_ProjectZ" in the same GBD
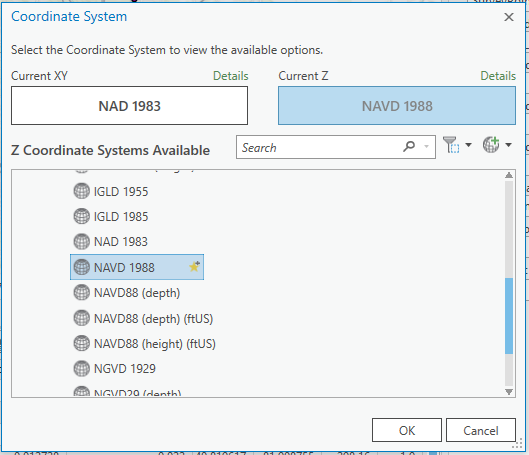
- For the Output Coordinates - Click on the Globe and Input the following for Current XY and Z - based upon assumptions above
Click on the Current XY box then select:
Geographic coordinate system > North America > USA and territories > NAD 1983
Click on the Current Z box and select:
Vertical Coordinate System > North America > NAVD 1988
Select NVAD 1988 even if you want ftUS. It is not possible to directly translate to NAVD88 (height) (ftUS)
Click OK
- A Geographic Transformation will automatically populate, you can change to other options but typically this is the optimal transformation for the Input and Output coordinate systems entered into ProjectZ
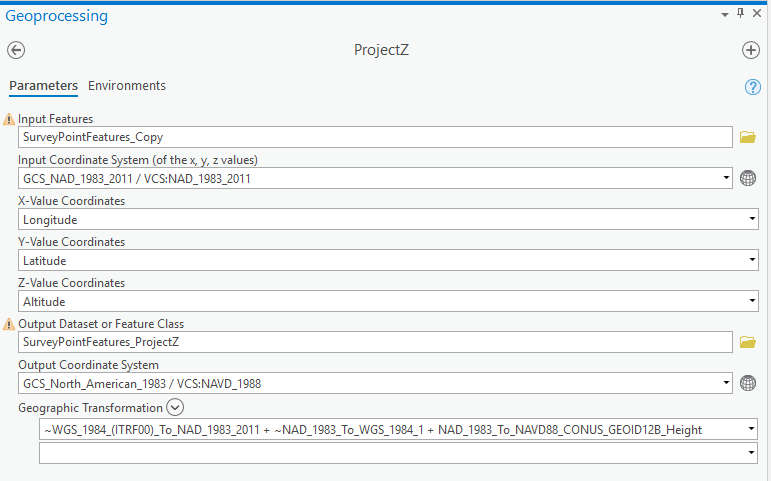
- Click "Run" - This will use the Latitude, Longitude and Altitude fields to create a new feature class as named above in NAD 1983 and NVAD 1988 as 3D data points.
If you need to convert the elevation data to US Feet, continue with the following. If you only need elevation in meters skip this step. This step is only converting the NVAD 1988 in meters to NAVD88 (height) (ftUS)
- In the Geoprocessing tab search for and select the "Project" tool, it should be in the data management tools
- For the input Feature Class select the feature class created above - SurveyPointFeatures_ProjectZ in my example
- Input a new feature class name for the Output Feature Class - I chose SurveyPointFeatures_Feet
- For the output Coordinate - Click on the Globe and Input the following for Current XY and Z
Click on the Current XY box then select:
Geographic coordinate system > North America > USA and territories > NAD 1983
Click on the Current Z box and select:
Vertical Coordinate System > North America > NAVD88 (height) (ftUS)
Click OK
- Check the Vertical Box
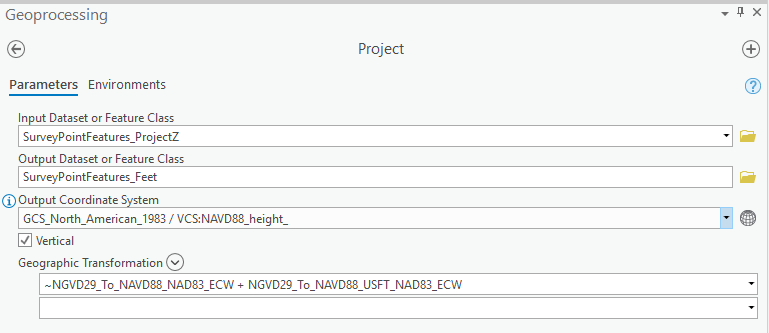
- Click Run
One last step.
- In the Geoprocessing tab search for and select the "Add XY Coordinates" tool, it should also be in the data management tools
- Select the SurveyPointFeatures_Feet or SurveyPointFeatures_ProjectZ feature from above and run the tool. This will add X,Y and Z data to the feature.
- Open the attribute table and the added Z value is your Elevation in feet or meters depending which feature you are using.
I hope this helps you with adding the elevation data to your data. As noted previously, please double check the coordinate system your GPS is running on. This is critical for accurate translation. You can also select a different output coordinate system if I assumed the incorrect system. For example we output to a projected coordinate system rather than a geographic system. So we set our Output Current XY to Projected coordinate system > State Plane > NAD 1983 (2011) (US Feet) > NAD 1983 (2011) StatePlane Ohio North FIPS 3401 (US Feet). This will return Northing, Easting and Elevation, rather than Lat, Long and Elevation.
Lance
- Mark as New
- Bookmark
- Subscribe
- Mute
- Subscribe to RSS Feed
- Permalink
- Report Inappropriate Content
Hi Lance,
Thank you for the great explanation. I have collected 2 years of data and having the same problem converting the GPS Altitude value to MSL elevation.
I am using Trimble R2 with Collector App and I set the Collector's Location Profile as:
GNSS Coordinate System: GCS NAD 1983 2011
Map Coordinate System: WGS 1984 Web Mercator Auxiliary Sphere.
Datum Transformation: WGS_1984_(ITRF08)_To_NAD_1983_2011
I want my final data to be in NAD 1983 (2011) StatePlane New York East FIPS 3101 (US Feet). Can you please help?
Thank you
- Mark as New
- Bookmark
- Subscribe
- Mute
- Subscribe to RSS Feed
- Permalink
- Report Inappropriate Content
Don,
I moved my reply to your new question here and will continue our dialog. Below was your last reply:
Lance, thank you for your quick and thorough response. I can clearly see that your knowledge base and experience far exceeds mine, but I will try to keep up.
In response to your follow-up questions:
When I say NAD 83 I mean that the Seiler Rep who walked me through the Trimble R2/ArcGIS Collector setup had me enter NAD 83 2011 as the GNSS Coordinate system and as the "to" system in my Datum Transformation box in my Profile. All the data that our organization stores on our in-house databases is NAD_1983_StatePlane_Indiana_East_FIPS_1301_Feet.
On the vertical data I ultimately want my data to be in US Feet.
With respect to metadata fields what I have done is to add metadata fields to a published Feature Service Layer and then added that new Feature Service layer to my Web Map. I have attempted to Configure a feature service to store GPS metadata. The obstacle that I encountered is that the instructions indicate that I should add field names to my feature attribute table and these field names are longer than that field will accept.
I will update my original answer later tonight to reflect the additional information you just provided. The first step you need to complete is getting your Trimble R2 parried with collector and pushing the correct data to ArcGIS Online (AGOL) database that is configured for GNSS data. Please take a look at Record GPS metadata for Classic or Prepare for high-accuracy data collection.
It sounds like your Trimble unit is configured to use a geographic coordinate system of NAD 1983 (2011) and a ellipsoidal-based, vertical coordinate system also of NAD 1983 2011. This is common for this type of system. Once you have the data configured in your database, Collector will store the "Raw" GPS data from the unit in the Latitude, Longitude and Altitude fields for each point collected. What the process described above does is take that raw data in GCS_NAD_1983_2011 / VCS: NAD_1983_2011 and using the tool "ProjectZ" creates new feature class of 3D points in NAD_1983_StatePlane_Indiana_East_FIPS_1301_Feet / NAVD 1988 (meters). You then run a "Project" tool of the data to convert the NAVD 1988 in meters to US Feet and "Add XY Coordinates" to display the Northing, Easting and Elevation data in the attribute table.
- Mark as New
- Bookmark
- Subscribe
- Mute
- Subscribe to RSS Feed
- Permalink
- Report Inappropriate Content
Lance, it looks like I may need tab-by-tab navigation help to locate the Current ArcGIS Coordinate System Data on MyESRI.com
Don Rodgers
City of Greenfield
GIS Coordinator
- Mark as New
- Bookmark
- Subscribe
- Mute
- Subscribe to RSS Feed
- Permalink
- Report Inappropriate Content
On my.esri.com go to:
My Organizations > Downloads
Select the "View Downloads" button next to either ArcGIS Pro or ArcGIS Desktop
Scroll down to the Data and Content section
Click the Download button next to "ArcGIS Coordinate Systems Data"
Mine is showing the current version being 10.7.167057
Your my.esri.com page may be slightly different depending upon your licensing but this should get you close.
- Mark as New
- Bookmark
- Subscribe
- Mute
- Subscribe to RSS Feed
- Permalink
- Report Inappropriate Content
Lance, it appears that I may need a more basic level of instruction.
Beginning with "Open ArcGIS Pro and load the original AGOL data into a map." I started a new project in ArcPro. I added a file geodatabase feature class from another ArcPro project that I confirmed contained several features.
Next I right-clicked the name of the feature class that appeared in the Contents page and clicked Data>Export features. Then I clicked the Run button and received the empty output warning. Since it was a yellow warning and I did not know what else to do I ignored the warning and continued.
When I run the Project Z tool I get to the part where I confirm the X,Y and Z value fields and, as you probably anticipated, I only see the Object ID and Shape field choices. This indicates failure to me and I am now stuck.
I can make web map and collect points. It seems like I do not understand how to get point features into an AGOL file that I can add to my ArcPro project so I can then run the Project Z tool.
Don Rodgers
City of Greenfield
GIS Coordinator
- Mark as New
- Bookmark
- Subscribe
- Mute
- Subscribe to RSS Feed
- Permalink
- Report Inappropriate Content
I can emphasize with you. I think it took a few months to get everything working on our collectors, AGOL and Z conversion.
I had assumed you were collecting data to a GNSS enabled map you had published on AGOL when using Collector. Is this correct? If so, in ArcGIS Pro you can open the data stored in this published map and copy the data to a local GDB. You can also logon to AGOL and export the data from there as well. The screen shot below shows a new blank map in ArcGIS Pro and I am adding the data from our AGOL survey map.
To add the data form AGOL:
On the Map Tab Click - Add Data
Go to Portal > My Content and navigate to where your collector data is stored on AGOL
Click OK
This adds the collected data to your map so you can then perform the export to a GDB as a copy
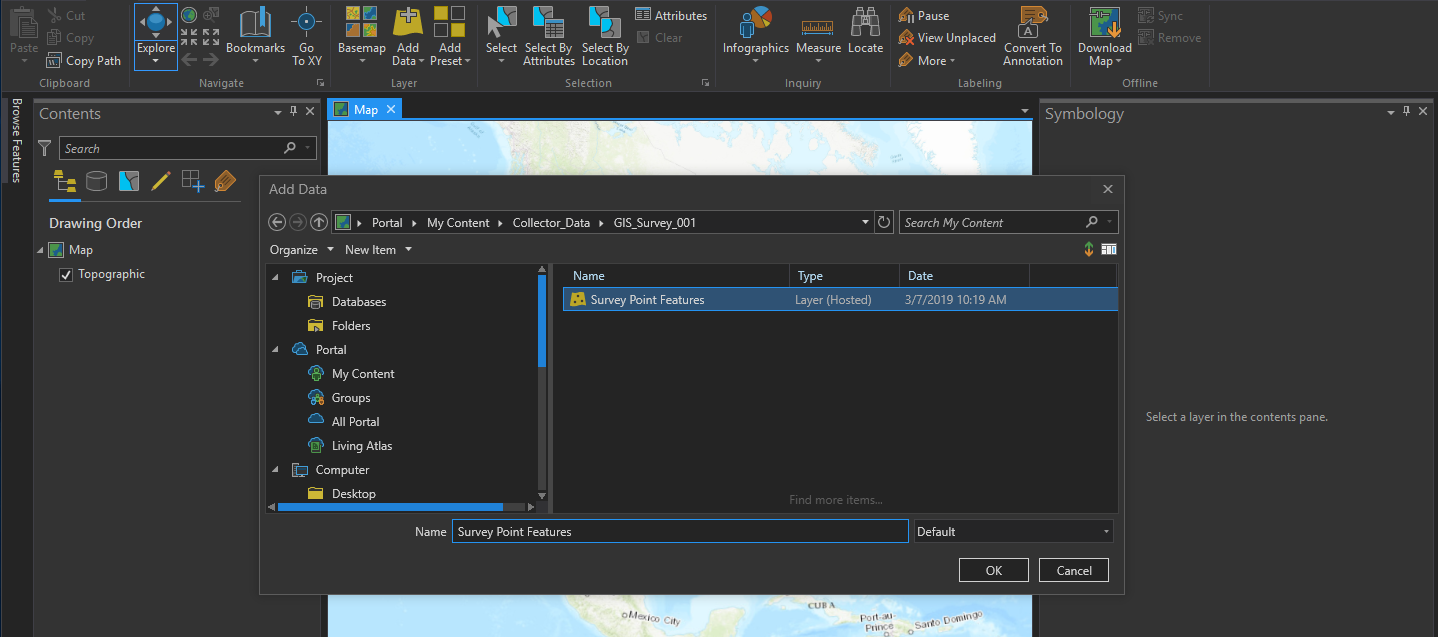
You can also go to AGOL and export the data as a GDB from there and skip this step. you would just need to add the feature class from the exported GDB to your ArcGIS Pro session.
- Mark as New
- Bookmark
- Subscribe
- Mute
- Subscribe to RSS Feed
- Permalink
- Report Inappropriate Content
Lance, one of my colleagues and I sat together and worked through the instructions that you provided and the collected data is still not displaying the correct elevations. We have concluded (if we are qualified to do so) that we need to begin with a basemap that is on the correct projection and datum configuration and a Arc Collector profile that matches.
Are you using a custom basemap or one of the basemaps that ESRI supplies? Also the Collector profile template does not seem to allow for a vertical datum. Is that a correct and relevant observation?
Thank you
Don Rodgers
City of Greenfield
GIS Coordinator
- Mark as New
- Bookmark
- Subscribe
- Mute
- Subscribe to RSS Feed
- Permalink
- Report Inappropriate Content
Correct, Collector does not work with vertical datums. Additionally, the base map does not impact the raw data. This is why you must use the raw data from your GPS that is stored in the Latitude, Longitude and Altitude attributes when points are collected to AGOL to create the 3D points and transform them to the coordinate system you ultimately need. I believe these are store in the raw data format or configured data formate for all GPS units. You may want to confirm this with Trimble, as we are using the Leica product line for our ArcGIS Collectors. It is my understanding some GPS manufactures are providing full horizontal and vertical datum support but this is not via ArcGIS Collector but rather the apps provided by the GPS manufactures such as Arrow and EOS that integrate with collector.
We we have our profile configured as shown below to work our State VRS system and post the data to AGOL as each point is collected in the field. We work through the process we have been discussing to generate our survey points for internal use to the accuracy of the instrument. Our GPS receiver and State VRS are using GSC NAD 1983 2011 and we use the ESRI default for AGOL of WGS 1984 Web Mercator Auxiliary Sphere as our map coordinate system. The transformation is the default Collector recommended for this paring.

You may need to take a step back and insure you have your database configured, have added the GNSS enabled fields and have it properly published to AGOL to be collecting the correct data. This must be working before you can even think about performing the transformation on the data. You also need to be sure your GPS software is also properly configured in conjunction with Collector. I am not going to be much help with a Trimble unit, as noted above, we are using Leica.
Also, do you have RTK enabled and configured for your GPS. This will substantially affect the performance of your R2 unit. That sounded like something out of “Star Wars”.
Sorry, I currently only have a few moments to respond but can provide additional information later this evening, if needed or you have more questions. This was not an easy process so please do not feel you are not qualified. There are just a ton of variables that all need to be inline for everything to work. Once it is working, it is great.
Small steps:
1) make sure your GPS is configured correctly and you are received the correct data, including RTK outside of Collector
2) make sure the GPS is correctly communicating with Collector.
3) is the correct data being posted to AGOL with the correct GNSS data
4) the data that is being returned back from AGOL is correct.
5) post processing is correct and using the correct transformations.