- Home
- :
- All Communities
- :
- Industries
- :
- Land Records and Valuation
- :
- Land Records and Valuation Questions
- :
- Re: ArcPro Parcel Fabric: How to change projected ...
- Subscribe to RSS Feed
- Mark Topic as New
- Mark Topic as Read
- Float this Topic for Current User
- Bookmark
- Subscribe
- Mute
- Printer Friendly Page
ArcPro Parcel Fabric: How to change projected coordinate system
- Mark as New
- Bookmark
- Subscribe
- Mute
- Subscribe to RSS Feed
- Permalink
- Report Inappropriate Content
Is there a way to change the coordinate projection for the Pro Parcel Fabric? I made a mistake on the vertical system and would like to change it from NAD83 in Meters to NAVD88_height (US Feet).
Solved! Go to Solution.
Accepted Solutions
- Mark as New
- Bookmark
- Subscribe
- Mute
- Subscribe to RSS Feed
- Permalink
- Report Inappropriate Content
We encourage not to project a parcel fabric as it can have corrupt your data - so making a backup should be step 1 and testing well the last step.
However, if you have to do it, here is the secret recipe:
How to project an ArcMap Parcel Fabric?
Description:
Projecting of a parcel fabric, including a datum transformation is not supported because many of the parcel fabric tables include XYZ coordinates as well as distance units which might change.
However, under certain circumstances and a series of steps, it is possible to project a parcel fabric.
This document describes the pre-requisites and steps to do it including the motivation / logic behind each step.
This process should only be carried out by someone proficient and tested well before used in the production environment again.
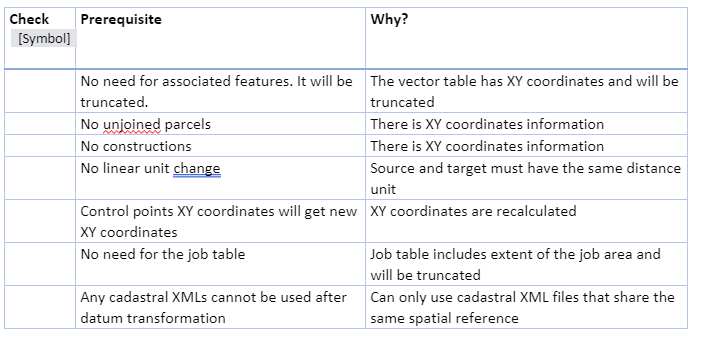
Prerequisites:
All the prerequisites must be fulfilled:
Risks:
- Control points XY coordinates will be recalculated using the target spatial reference.
- Control point association to point might be lost if they are not close to the parcel points (based on the entered tolerance during control point import).
Prep:
- Download and install the Delete Fabric Records Add-in – it will be used to delete records from certain system tables (vectors, adjustments, jobs, control points).
- Install the Parcel Fabric Quality Control Add-In – it will be used to recalculate the point’s XY coordinates.
Cleanup steps:
- Add the source PF to the map
- Right click on the control layer, Data [Symbol] Export Data and save it as a SHP file.
- In the Catalog window right click on the parcel fabric [Symbol] truncate Fabric

- Select these options:

- Next [Symbol] truncate
- Control Points prep:
- Add the exported control to you map from the SHP file
- Open the attribute table
- Delete these fields:
- PointID
- X
- Y
- Select the feature dataset that contains the parcel fabric [Symbol] Right Click[Symbol] Import [Symbol] Feature Class (multiple) and add the SHP file as input.
- Using the parcel editor toolbar, start editing and open the ‘Parcel Explorer’: make sure there are no constructions. Delete any construction.
- Drag the parcel class to the map, open the attribute table and make sure all the parcel ‘Joined’ field is equal to 1. If you see any parcel that are unjoined, delete them or join them before projecting the parcel fabric.
Projecting the Data Steps:
- From the geoprocessing tools open the ‘Project’ tool
- As input specify the feature dataset containing the parcel fabric
- Specify the new feature dataset name and location
- Specify the target spatial reference and any datum transformation

- Press Ok to project
- Import back the control points:
- Right click on the parcel fabric [Symbol] Import [Symbol] Control Points…

- Check ‘Use shape for coordinates’ and click Next

- Since there are no control points in the target fabric no need to define setting for merging. Only set the match control point tolerance and press Next & Finish.

After projecting the parcel fabric the points geometry is projected but the recorded coordinates in the attribute table are still using the old projection and need to be fixed.
Re-calculating XY on points:
- In Catalog window right click the parcel fabric and press “Coordinate Inverse”

Additional operations:
- Save the editing MXD under a new name
- Point the map to the new projected data source
- Change the map’s spatial reference to match the source data (else it will project on the fly and impact performance)
- Recommended tests:
- Zoom closely to a point and make sure the XY coordinates match it’s location (geometry). Identify tool shows coordinates.
- Zoom to a control point and make sure it is associated and in the correct location (geometry =XY attributes)
- Editing workflow: rejoin a parcel
- Editing workflow: Unjoin a parcel and then join it from the parcel explorer
- How would you know it is projected correctly?
- Find a control for which the coordinates are known in the new coordinate system
- Mark as New
- Bookmark
- Subscribe
- Mute
- Subscribe to RSS Feed
- Permalink
- Report Inappropriate Content
I believe you can reproject a feature dataset containing a parcel fabric just as you would any other feature using Project—Data Management toolbox | ArcGIS Desktop. In the tool, you would use the same horizontal system and only change the vertical. However, to go from NAD83 to NAVD88_height US FT you need to do this in two steps as there is not a direct transformation.
First run the project tool on your feature dataset using the same horizontal system for the current XY but select NAVD88 as the vertical in the Current Z for the output coordinate system. Do not select NAVD88_height US FT at this time. Make sure to select the “Vertical” option in the dialog once it appears. The tool should automatically select the appropriate geographic transformation. This will create a new feature dataset in NAVD88.
Second using the newly created NAVD88 feature dataset, run the project tool again using the same horizontal system but this time select NAVD88_height US FT as the vertical. Again make sure to select the “Vertical” option.
- Mark as New
- Bookmark
- Subscribe
- Mute
- Subscribe to RSS Feed
- Permalink
- Report Inappropriate Content
We encourage not to project a parcel fabric as it can have corrupt your data - so making a backup should be step 1 and testing well the last step.
However, if you have to do it, here is the secret recipe:
How to project an ArcMap Parcel Fabric?
Description:
Projecting of a parcel fabric, including a datum transformation is not supported because many of the parcel fabric tables include XYZ coordinates as well as distance units which might change.
However, under certain circumstances and a series of steps, it is possible to project a parcel fabric.
This document describes the pre-requisites and steps to do it including the motivation / logic behind each step.
This process should only be carried out by someone proficient and tested well before used in the production environment again.
Prerequisites:
All the prerequisites must be fulfilled:
Risks:
- Control points XY coordinates will be recalculated using the target spatial reference.
- Control point association to point might be lost if they are not close to the parcel points (based on the entered tolerance during control point import).
Prep:
- Download and install the Delete Fabric Records Add-in – it will be used to delete records from certain system tables (vectors, adjustments, jobs, control points).
- Install the Parcel Fabric Quality Control Add-In – it will be used to recalculate the point’s XY coordinates.
Cleanup steps:
- Add the source PF to the map
- Right click on the control layer, Data [Symbol] Export Data and save it as a SHP file.
- In the Catalog window right click on the parcel fabric [Symbol] truncate Fabric
- Select these options:
- Next [Symbol] truncate
- Control Points prep:
- Add the exported control to you map from the SHP file
- Open the attribute table
- Delete these fields:
- PointID
- X
- Y
- Select the feature dataset that contains the parcel fabric [Symbol] Right Click[Symbol] Import [Symbol] Feature Class (multiple) and add the SHP file as input.
- Using the parcel editor toolbar, start editing and open the ‘Parcel Explorer’: make sure there are no constructions. Delete any construction.
- Drag the parcel class to the map, open the attribute table and make sure all the parcel ‘Joined’ field is equal to 1. If you see any parcel that are unjoined, delete them or join them before projecting the parcel fabric.
Projecting the Data Steps:
- From the geoprocessing tools open the ‘Project’ tool
- As input specify the feature dataset containing the parcel fabric
- Specify the new feature dataset name and location
- Specify the target spatial reference and any datum transformation
- Press Ok to project
- Import back the control points:
- Right click on the parcel fabric [Symbol] Import [Symbol] Control Points…
- Check ‘Use shape for coordinates’ and click Next
- Since there are no control points in the target fabric no need to define setting for merging. Only set the match control point tolerance and press Next & Finish.
After projecting the parcel fabric the points geometry is projected but the recorded coordinates in the attribute table are still using the old projection and need to be fixed.
Re-calculating XY on points:
- In Catalog window right click the parcel fabric and press “Coordinate Inverse”
Additional operations:
- Save the editing MXD under a new name
- Point the map to the new projected data source
- Change the map’s spatial reference to match the source data (else it will project on the fly and impact performance)
- Recommended tests:
- Zoom closely to a point and make sure the XY coordinates match it’s location (geometry). Identify tool shows coordinates.
- Zoom to a control point and make sure it is associated and in the correct location (geometry =XY attributes)
- Editing workflow: rejoin a parcel
- Editing workflow: Unjoin a parcel and then join it from the parcel explorer
- How would you know it is projected correctly?
- Find a control for which the coordinates are known in the new coordinate system
- Mark as New
- Bookmark
- Subscribe
- Mute
- Subscribe to RSS Feed
- Permalink
- Report Inappropriate Content
The question is for a Pro Fabric - would these add-ins and methods still work?